Posts

6 Popular kitchen layouts (with pictures)

Ever noticed how creative you can get with your layout of a kitchen? the most asked question is “What layout would suit me and my house?” well, no more wondering – we have the perfect guide (with pictures) that will make being in the kitchen a breeze with the layout suited to your space.

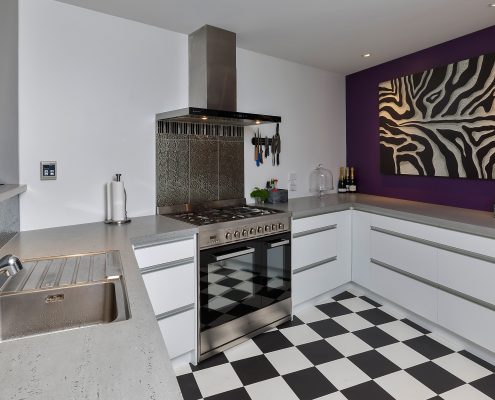
First we have the U-shaped kitchen – this is perfect if you have a couple of cooks in the house who enjoy cooking together, this layout is designed to create and hold a wide range or space and storage making it easier to have more than just one in the kitchen. This layout best suits the larger rooms the kitchen is located as this layout is quite spaced out. The U-shape is perfect as it offers counters and work spaces on 3 walls and there is still the option of adding an island in the middle. Essentially, the U-shaped kitchen can offer the best of both worlds. The middle of the kitchen is yours to play with –  you can even include an island in the middle, this is ideal for the home owner that likes to not only spent lots of time in the kitchen making meals and baking but also sees it as a communal family room where everyone can get together.


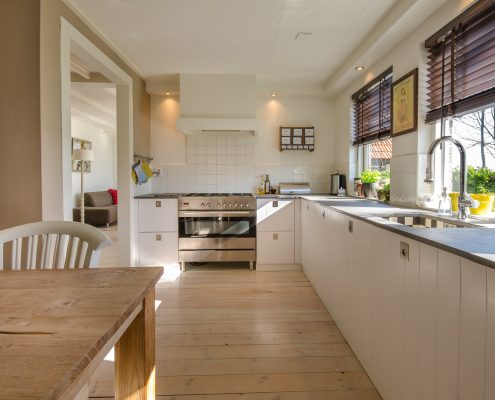
Secondly, we have the L-shaped kitchen – this is perfect for those smaller units/flats that don’t have as much space but you still want to have as much space and storage as you possibly can, this is mainly ideal for one person cooking per time in a comfortable space. The only difference between this and the U-shaped kitchen is your pretty much losing one bench top and a few cupboards and drawers but being a smaller house with less residents this is perfectly workable. This dead end approach is great for those wanting to cook in privacy but if you don’t want the family shut out and like the idea of kids wandering through to check on dinner, the next option could be for you.

The third is the wonderful Gallery kitchen – This is a GREAT space saver and to be fair, some will argue this has slightly gone off the fashion board in the recent years with people more budging for those U & L shaped kitchen layouts because of the strict shape and closed-in feel doesn’t compliment a open plan living plan. But let me tell you the benefits, firstly, they can provide a two-walled approach to storage and facilities in a small space. Everything that a home cook needs is available on both sides but it is still a great way to save space in kitchen with minimal room to move. Secondly, the long walkway between the two work areas can open up the space on either side, allowing for a constant stream of traffic between the back yard and the dining area and a communal feel.

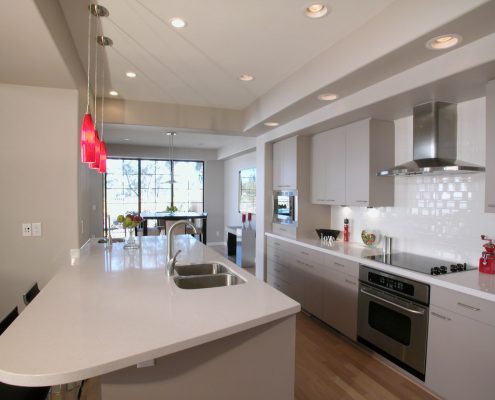
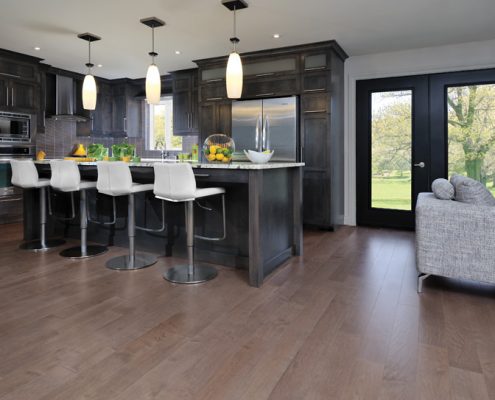
Number 4 Island kitchen – This design divides large kitchens into efficient, smaller working areas. The Island kitchens are by far the most popular layout because not only do they provide a host of new design options for new builds and renovations but they can actually enhance the layouts mentioned above. An island has many benefits depending on your design taste and style, it can give excellent depth and an opportunity to change this into a L-shaped kitchen but also a new meaning to a gallery kitchen as long as there is enough space to play with. Galleys are typically narrow but in a larger room, an island gives a stopping point in the middle for families to sit at. In other kitchens, like the large U-shaped kitchens, islands can be a great focal point in the middle of a large, dominating kitchen. Some kitchens that are short on space can use them for preparation while others will gain an alternative dining area.

Dark panels in kitchen - Grey

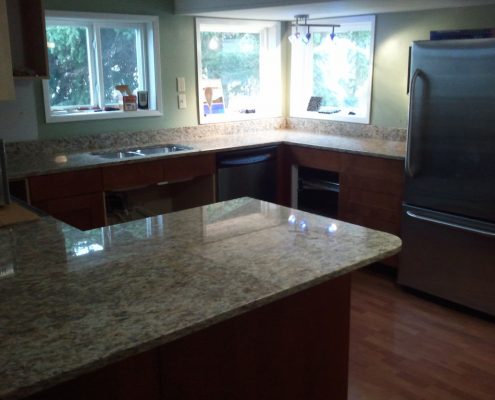
Peninsula kitchen coming in at number 5 – This is pretty much just a U-shape kitchen but without the wall behind, this design is perfect if you are wanting to achieve an island in your layout but just don’t have the space to put it in the middle This is ideal for homes that really want an island to work on or eat but don’t really have the space to build one out in the middle of the room. There are limitations to this approach in terms of its use and accessibility, but it can be a great compromise for enhancing a small, L-shaped layout.


The comfortable kitchen for one at number 6 we have our last but not least One wall kitchen – again, these are great for those smaller living areas, this layout would work fantastic in a holiday home or even a small flat, the layout has just enough space for everything one person needs – it looks tidy and can be kept that way quite easily – it is great for those on a budget as well as you aren’t really adding much to this design as it’s a nice, simple layout.


Choices

Kitchen Professional or General Contractor?

This time of year is the time everyone decides the kitchen needs some TLC or a whole new look, finding the best, creative kitchen wizard can become a nightmare if you leave this too long, bookings come in and out the door like crazy and delays occur with the kitchen installation dates and even manufacturing of the project BUT the reason home owners decide to suck it up and work around the talented lass/lad is because of the exceptional knowledge and organizing they take care of instead of you stressing out wondering if you have sorted everything and prepared all the subcontractors etc. also, you generally just end up dealing with the wizard himself opposed to making countless contact to different places here and there to sort everything.

Quality VS. Value:

Sure, we all tend to naturally go for what’s cheaper but if your looking for a quality job that will stand the test of time (and a definite guarantee on this one!) then a professional kitchen designer, manufacturer and installer is 100% the way to go. In many purchasing situations – a great deal is the desired outcome, the same goes for a standard renovation. A ‘too good to be true’ price could result in low-grade products and a hasty installation. A professional kitchen designer can offer you peace of mind that your investment is backed by their guarantee, and even more value in the form of reliability, expert advice and customer service another bonus is a lot of kitchen professionals can offer more customization around your ideas and style.

Reliability:

Most homeowners are more open to spending a little extra if it buys them peace of mind. A general contractor generally can’t offer the same level of reliability as a professional can – and in saying this, it’s not a deliberate situation they are constantly in but more so because they have many other projects that may come to be a priority, or some may be more urgent to complete than others. Some (not all) general contractors may have proof of the proper business licenses and insurances, but that’s usually where the credentials stop. A kitchen professional will have more resources to prove that his/her work is certified and reliable. Read reviews on the business pages, ask around locally to see who people recommend and make sure you won’t get into a catastrophe.

Level of expertise:

From your appointment to your installation, a kitchen specialist can offer you an elevated level of expert advice. For instance, Next Edition Kitchens LTD has a team of kitchen designers that are dedicated to finding the most current trends and helping you design your dream kitchen. Because most of its products are made and manufactured in its on-site facility, every member of Next Edition Kitchens LTD family is equipped to answer any question you may have, as well as offer expert advice regarding your personal wants and needs.

Customer Service:

Now this is probably one of the most important aspects — specialized professionals have the ability to tend to your needs from before your consultation appointment is scheduled, to, well – after your project is completed. Where a general contractor may be over-worked and too busy to work with your busy schedule, a professional kitchen company has employees ready to help. Oftentimes, a professional can schedule your appointment and installation when it’s most convenient for you. If you have questions or concerns, a professional company will always be there to answer your phone calls. Should you have to reach them for any reason after your installation, the same holds true. Whereas, it can be nearly impossible with a contractor. But you can rest assured that a professional will be around—and flexible—after your job is completed.

There are plenty of instances where a general contractor is a viable option, but for kitchen re-modelling specifically, a specialist is the way to go. The kitchen can be an especially demanding room to renovate, and a true professional has the level of expertise and reliability that is in line with those demands. No wonder more homeowners are choosing kitchen specialists for their kitchen re-modelling projects!


Utensils - Organised kitchen

How-To Organize Your Kitchen EASILY

Is your kitchen well overdue for some re-organizing? No matter how much room you may have (or may not have) in the kitchen – it is do-able to have a lovely, organised kitchen that won’t give you nightmares.

We are always on the hunt for a magic answer or even a cleaning fairy that would come around each day and have everything clean and organised with the flick of the wand before we get home, if you are sick of searching and dreaming of the day this will come – read ahead and get all the exclusive ideas from the professionals (and tricks and tips that ACTUALLY make life 100% easier when keeping the kitchen in pristine condition!)

Step one – start from scratch by pulling everything out of cupboards and drawers, one-by-one otherwise you’ll get lost in amoungst all the food & cooking utensils (this is the part where you can get the kids involved or if you prefer it by yourself, go for gold.)

After everything is pulled out, wipe down the shelves and drawers – you’ll be surprised how much dust builds up over time.

Start by putting the least used utensils in the bottom drawers and things like canned foods at the top of the cabinet as these seem to last longer and aren’t everyday things we may tend to grab for when we open the pantry make sure you remove things that may not belong in the kitchen (we all have the fruit bowl that’s filled with everything BUT fruit) – then as you go down, try placing all the everyday necessities in the middle shelves as you will find it easier going into the cupboard, grabbing what you need and placing it back especially if its right in front of you (we are all human and find this the fastest and least time-taking method) right at the bottom should be a shelf for things like your potato box or even bigger appliances.

***Be sure to check expiry dates on all food before you place it back in cupboards as you may have something dated from 2001 that you never knew was hiding away in there.***

Step two – Put things in the exact same spot after use, this will help keep the organisation in place and will get you familiar where everything is along with your family catching on as well (there will be no excuse for them to not dry and put away dishes anymore!)

Step three – Keep your purchases (unless its food, of course) to a minimum, if you already have all the needed appliances then really think about future purchases, ask yourself “How many times will this actually get used? Is it going to replace any appliance I already have that may do the similar thing? Where will I store this? Etc.” try avoiding purchases that are only going to be used very rarely – ask  your friends and family as they are usually bound to have one you can use.

Step four – Pinterest organisation DIY ideas, this has been my saviour and has some wonderful ideas for storing many different things in your kitchen which makes it look tidy while keeping it all out of the way.

Step five – Always keep up to date with kitchen renovation ideas, kitchen renovations can be costly but they can also be great for a budget, when you slowly renovate the kitchen bit-by-bit you’ll be saving money and time with making the most of what you have with possible DIY ideas to temporarily add on to your kitchen and these ideas can simply be buying a couple of stick on hooks to place inside your cabinet door to hold numerous kitchen utensils – the benefit of exploring these cheap (yet fantastic, budget friendly ideas) is that you will slowly make these more of a permanent add-on and find what works for you as you could then go to Next Edition Kitchen’s or your local cabinetry place and get a hook rack custom made if the stick on hooks are working well for you.

It’s all trial and error but it’s a very good idea to get into.

With doing DIY ideas, you can get the family involved as well and have some fun while also teaching them important skills and encouraging organisation to be up-kept in the kitchen which will pan into all areas of the house.

So, what are you waiting for? be your own cleaning fairy and be the envy of all your friends and family with the cleanest kitchen ever laid eyes on!

Bath

5-Star Spa Treatment in your own home!

It’s almost the end of February and let’s be real, we could all use some pamper time… Imagine having a 5-star spa experience in the comfort of your own home, good news! No need to imagine with our simple guide on how to transform your bathroom into a spa treatment room with no fuss and your wallets will thank you and us on this one.


Begin with clearing the clutter lingering around taking up unnecessary space, nothing invades relaxation like a cluttered-up mess with all sorts of bits and bobs you didn’t even know how it made it’s way into the bathroom in the first place.

Spend a reasonable time making sure all the surfaces are wiped down and the cluttered items put in the correct places.

Fold 3x towels and have a nice light-weight dressing gown (or fluffy, depending on mother nature’s decision on the weather that day!) awaiting you on a clear space in your bathroom.


Now that your bathroom is spick and span – lets move on to setting the scene of your very own 5-star spa setting, get some tealight candles (or even scented candles.) scatter them safely around the bathroom where they won’t cause a hazard and light them when ready.

Leave the lighting on low if you can and if you have some incense or room fragrance, give your room a spritz to help set the spa-like scene.


Make a playlist of soft, contemporary music – or whichever music relaxes you best or even have a nice book handy.

Start the process by running a nice, warm bath while adding in your favorite bath salts, bubble bath etc. Exfoliate your body with a salt scrub or loofah. Use circular motions towards your heart all over your body to increase circulation and reduce cellulite.

Once you’re all scrubbed make sure to apply a nourishing lotion. Use a towel to pat your skin dry, then seal in the moisture by applying a lotion or body cream, a lavender scented one would be very relaxing! Pour yourself a glass of fresh, ice cold lemon water (or whatever taste of drink you love) and let your troubles melt away.


Now that your body is relaxed – the pampering can begin. Start by washing your face with luke warm water and your desired face wash, gently exfoliate your skin with some exfoliator (this step is optional, but it will really treat your skin to a 5-star spa experience.) rinse off with COLD water and now’s the fun part… FACE MASK! Being a previous qualified Beauty Therapist I have undergone studies to suit different skin types but there is one face mask you can make from home to refresh, soothe and smooth and suit ALL SKIN TYPES and as follows:


  • Combine 1/2 cup hot—not boiling—water and 1/3 cup oatmeal.
  • After the water and oatmeal have settled for two or three minutes, mix in 2 tablespoons plain yogurt, 2 tablespoons honey, and 1 small egg white.
  • Apply a thin layer of the mask to your face, and let it sit for 10 to 15 minutes gently wash off and moisturise.


Feel free to treat yourself to other treatments like a manicure, eye mask or hair mask, whatever you need to do to feel pampered. Relax for as long as you wish and enjoy the peace and quiet.

Cupboards

Cleaning out those Cluttered Cupboards

Almost that time to do that dreaded spring clean? Don’t worry, de-cluttering can be a sad yet oddly satisfying time, getting rid of all the Tupperware containers you don’t use but still keep because it will defs get used (but let’s be honest, the only use it’s had is collecting spiderwebs and dust…)

I am always on the ‘procrastinating’ train for cleaning out my cupboards, every time I open them I’m pretty sure I could get lost in there! It’s pretty scary.

I have decided to share my knowledge after finally getting lost in my Tupperware & pots/pans cupboards (I found my way out after 2 days) on how to keep your cupboards up to date and spiderweb free – whether it’s the organization or some handy little DIY projects.

  • Going through my Tupperware cupboards I had to really ask myself whether or not I really needed 57 containers in a small corner cupboard just stacking up on top of each other, some with lost lids and some with cracks in them, now – I’m that person who will literally find any excuse to keep things (call me Whangarei’s #1 Tupperware hoarder if you will…) I pulled every single container out and decided what use is a container without a lid or one that’s about to split in half on me? I threw those ones away and there was already light beaming from the start of my cupboard, I organized biggest to smallest leaving the bigger ones at the back – I had matched them all up with there lids and you would not believe how much room I had – not to mention how clean and tidy it was!
  • If you are wanting to get a little more sorted on a new level of organized, I would highly recommend investing in a shelf called a “Lazy Susan” you can pull this handy little shelf out to avoid bending down all the time to get whatever you have put at the back of the cupboard and it avoids giving you that extra room to have things you don’t use hiding at the back awaiting that slim chance that it may get used. Another benefit of this is that it’s so easy to keep clean, who doesn’t like the sound of that?
  • If you are stuck on what you think you may use in the future – think back to when you last used that container/pot/pan, if you haven’t pulled it out of the cupboard and its looking like a spiders playground with all the cobwebs on it then definitely throw that away, or better yet – take it out give it a good clean and go donate it to the salvation army, this is very rewarding and it gets rid of those containers you don’t need!
  • Search ideas on Pinterest and Google on how to create special, dedicated little pockets to hang on the inside on the door to hold things like utensils/dish-washing brushes etc.
  • Have a garage sale, having a garage sale can encourage you to not only de-clutter your kitchen cupboards but a lot of the other areas in your house while also getting a little something back – fun idea to team up with friends and family!


Check out these ideas:

https://www.pinterest.nz/pin/255579347577140286/

https://www.pinterest.nz/pin/135882113733755469/

https://www.pinterest.nz/pin/417005246723758378/

https://www.pinterest.nz/pin/323414816964781794/