A brief history about the kitchen

Today i wanted to take everyone back to the very first kitchen and the history of how we have evolved into today’s design. Everyone knows or may have seen the bright, funky colors and basic, similar designs kitchens where a few decades ago (in my opinion, i love modern but i also love retro and original! so evolving into the styles and trends of today was and still is very exciting for me) and we’ve all seen and heard of the newer kitchen designs dated as of today, the future designs really interest me.

Get comfy, make a hot tea and be prepared to see the timeline.

  1. THE ORIGINS – Back in ancient times and I’m talking years and years ago, our ancestors cooked on open fires that were constructed outside on the flat ground, later on they had an idea to construct something that would hold pots and pans above the heat instead of holding them, themselves. they had come up with a simple, masonry design which was put in place to hold the handles of the pots and pans etc. In this era, the food was often placed in metal cauldrons that were hanging above the fire. These cooking areas naturally caused people to gather as they were the primary source of heat, light, safety and of course, food. The smoke and soot let off from the fires were a HUGE problem until the 16th century as it would go everywhere, this is when chimneys came into the mix With a chimney, smoke was drawn up and out of the great hall, making it easier to breath and easier to create large cooking fires in fireplaces. Here’s a picture to show you exactly how it was:
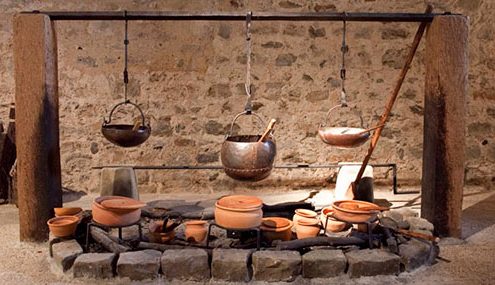
12th Century Kitchen

12th Century Kitchen


2. THE DEVELOPMENT OF STOVES – Moving along to the year of 1735, economic trends and politics had a massive influence on the practicality and design of the kitchen, technological advancements were constant many of which came in effect to minimize the time spent on a meal and the work involved around it, in the 18th century this is where we would find this design to come into effect (still fueled by wood at this stage.) One of the earliest wood-burning kitchen stoves was the Stew Stove (or Castrol Stove) developed in 1735 by the French designer Francois Cuvilliés. An early yet famous example of a metal stove is the Franklin stove (pictured below) which came into effect in the 18th century, invented by Benjamin Franklin (thats right, the guy you see on American $100 bills) in 1742. It had a special guide in place for hot gases to escape, allowing heat to enter the room instead of going up the chimney. However, this stove was designed only for heating, not for cooking – Strange huh?! The industrial revolution encouraged new inventions, cheaper prices, and new ways of efficiency. The most common stove for heating in the industrial world for almost a century and a half was the coal-burning one. Coal stoves came in all sizes and shapes and different operating principles. Since coal burns at a much higher temperature than wood, coal stoves needed to be constructed to withstand the high heat levels.
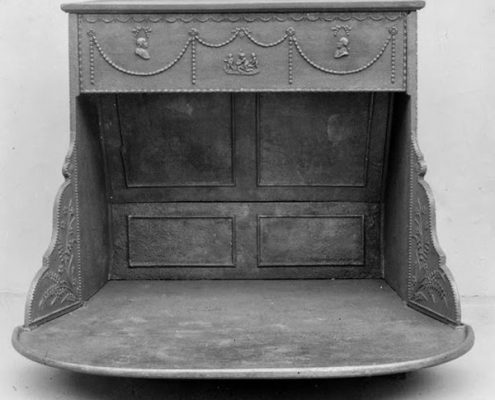
 

1735 - Oven

1735 – Oven


3. THE OBERLIN STOVE – Progressing a little up the timeline to 1834, a man named Philo Stewart took it upon himself to design a compact, wood burning cast iron stove in which was named the Oberlin Stove. this was a metal stove, small enough to use for cooking. It was much more efficient than cooking in a fireplace this is because it had increased cooking temperatures and had the option to record cooking times. It actually blew up and became a major success for Philo,  it could be cast into decorative shapes and forms and could easily withstand temperature swings from hot to cold. These iron stoves evolved into specialized cooking appliances with flue pipes connected to the chimney, oven holes, and installations for heating water.
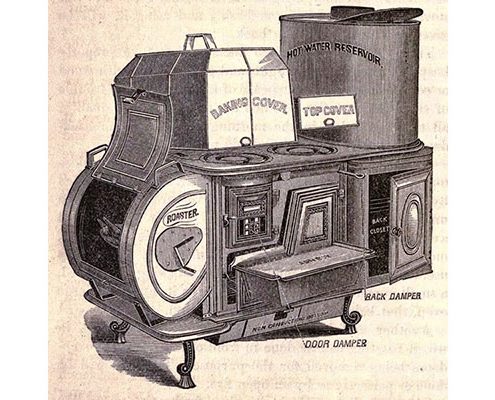
1869 - Philo

1869 – Philo


4. THE MOVE TO GAS STOVES – Complaints and concerns about air pollution from the smoke excretions arose and sent a decline in coal stove purchases way down hill – Gas the became the next best thing. Because they were fueled by gas the production of the oven became lighter and even smaller! the genius British inventor James Sharp gave a big yes to the gas stove invention in 1826. By the 1920s, gas ovens were used in most domestic kitchens and was very rare to see the older ones.
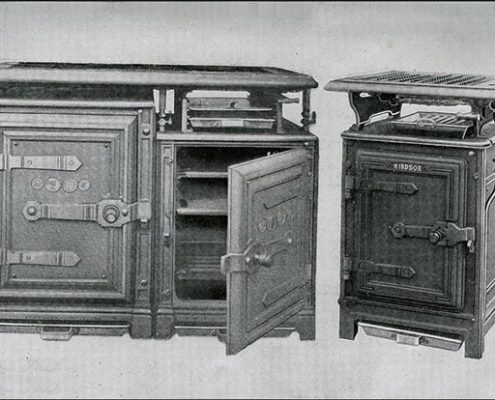
1826 - James Sharp

1826 – James Sharp


5. THE GRAND APPEARANCE FROM THE ELECTRIC OVEN – This oven caused quite the competition between the Gas stove and itself, this occurred in the 1920’s and 1930’s. The Copeman Electric Stove Company (based in Michigan) received the first patent for an electric stove in 1912. Copeman Electric Stove, 1912 – Mostly wood, it had two ovens, top units, automatic timer and heat control.
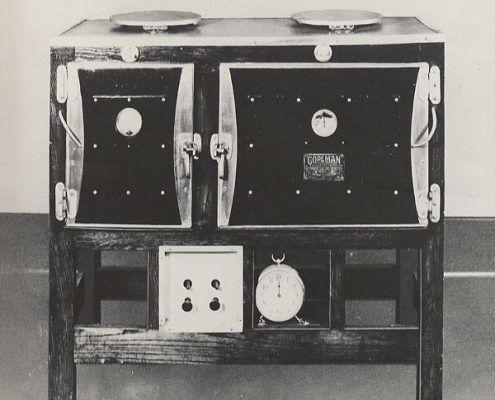
Copeman Electric Stove, 1912

Copeman Electric Stove, 1912


6. MODERN KITCHEN DEVELOPMENT (Post world war #2 onwards…) – The housing and manufacturing development of post World War 2 made a huge effect on what we class as the “modern” kitchen nowadays. There was a major jump in demands for kitchen technology and equipment that inspired homeowners  to rip down the walls that once hid their efficient kitchens. The kitchen was becoming quieter, cleaner, better organized and easier to work in, a sense of pride, and slowly a place to entertain family and friends. In the 1960’s and 1970’s other social changes were taking place that upgraded the style and trend of the kitchen, a renewed interest in home baking/cooking, having a dedicated space for utensils and even entertaining was suitable for having the kitchen be the heart of the home. The kitchen became a place for improving baking skills, displaying fancy (expensive) cookware and becoming the heart for social gatherings. By the 1980’s, the idea of a completely open kitchen with appliances in the open, came into the new idea of design.
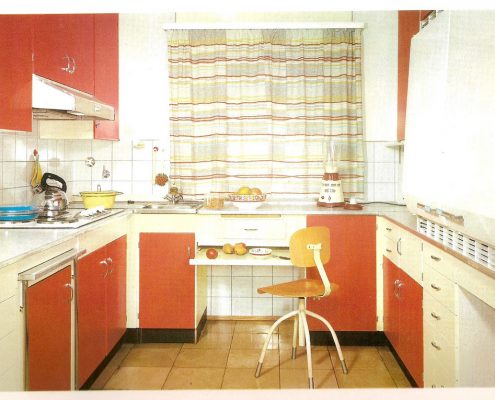
1960's - Kitchen

1960’s – Kitchen


7. CONTEMPORARY KITCHENS – Today’s ovens have evolved into more time, health and energy efficient, our appliances are finally catching up with our fast moving lifestyles, speed ovens for instance, cuts the cooking time in half which actually saves energy used during meal preparation The kitchen doesn’t look like the kitchen, in the traditional sense. It’s now a clean space, with a full range of sleek appliances looking towards a sustainable future. Only up from here and we’re excited to see what the future brings.
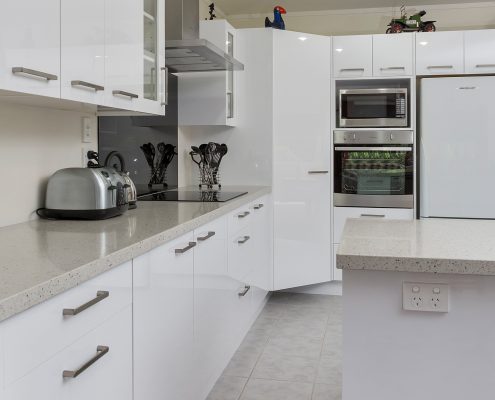
2018 - Kitchen (Next Edition Kitchens)

2018 – Kitchen (Next Edition Kitchens)

Flooring

Install Kitchen Cabinetry Or Flooring First?

A repetitive, yet relevant question you may be asking yourself could be delaying your first step to renovations and that tricky questions is: “Do I reface my cabinetry first or does the flooring need to be done first?” Google has all sorts of answers which can often lead back to square one of being confused again – although there is no wrong way to do this there is safer, more practical ways of sorting the schedule.

When you replace your cabinetry, your existing flooring does run the basic and obvious risk of damage, although our busy working bee’s take all precautions there can be some un-intentional markings/damage made.

Here’s where you may be getting confused; when you are having a whole new kitchen put in, flooring is best to go in BEFOREHAND as the layout of the new kitchen will most likely be different therefor flooring is required to go in first to guide the layout BUT when you are just refacing the existing units the flooring is suggested to wait until after the refacing is done as the layout is set up already so the workers can update the fronts and the flooring is being updated in the existing layout it already is generally.

One of the benefits to having the kitchen renovated first is that you can be more confident in your flooring selection, matching your cabinet finish to smaller flooring samples and hypothetical finishes is about as helpful as painting a home’s interiors via the colours shows on small paint swatches—a process many of us have pulled our hair out over, by waiting to install your flooring after the kitchen is done, you’ll have some time to contemplate which colours or finishes will look best with your brand-new kitchen.

The only exception – install floating hardwood floors AFTER the cabinets, if you are planning on having a hardwood floating floor (or any floating floor such as cork or laminate) you should consider installing the flooring after, why? Because floating floors are clicked together and not glued down to the floor, the reason for this is that the floating floors tend to move, and they expand and contract. If part of the floor is trapped under the cabinetry (which is quite heavy) it cannot properly move resulting in all sorts of issues including bulging, buckling or even breaking. Having this in BEFORE the cabinetry ensures the cleanest look with the cabinets – you don’t need to worry about cutting some to size to fit around the cabinetry and instead can have a nice, flush floor with no issues.


There we have it! hoping this helped a few head scratches and has helped you move onto the next step.

Oven

How to clean your oven naturally

Today I am inspired to write this blog as my oven is in dire need of some TLC – I did some research on how important this is and the results where mind blowing, I had no idea how regularly you theoretically should be “maintaining” your oven. It seems to be one of those things that “you’ll get around to that tomorrow” and tomorrow turns into the next day, and the day after that and so on but let me remind you how important this is!

My first question I had when I opened my oven last night was “when did I even last clean this?” my answer was struggling to come to mind, it must have been a good 4 months ago (not so bad, right?!) well – WRONG! Here my next question came, how often are you supposed to clean your oven?

Once. Every. Month. HOW BIZARRE! Of all the years I have been in charge of that sort of thing, I never even realized there was actually a time period on how often you should be doing it.

Why is there a time on this? I get the hygiene side of it but what’s the actual history behind this? Simple, your oven can become less efficient at reaching temperatures and eventually may just stop working all together if burnt food/build-up is left unattended.

Crusty build up can also impact the taste of your food and, while high temperatures can kill some bacteria, it’s not a good place to be cooking food (like I said, hygiene)

So, now that I’ve got you itching to go have a look at your ovens – I also have a natural guide on how to clean your oven without even turning it on, this method is super easy and really cost efficient.


What you will need:

  • Baking Soda (1/2 cup)
  • Water (to make a paste)
  • Rubber Gloves (Preferably durable, non-disposable ones)
  • Damp dishcloth
  • Spray Bottle
  • Vinegar (White)


Instructions:

  1. Clear out the oven

Take out all dish-racks (clean those as well) make sure everything is removed so you have access to get deep in the back of the oven to clear that build-up.

  1. Mix the paste

In a small bowl, mix a 1/2 cup of baking soda with a few tablespoons of water. Adjust the ratio of both as needed until you have a spreadable paste.

  1. Coat the oven

Spread the paste all over the interior surfaces of your oven, steering clear of the heating elements. Use gloves for this portion, as the oven may be pretty gunky. The baking soda will turn a brownish colour as you rub it in; it also might be chunkier in some places than others, which is fine. Just try to coat the whole oven to the best of your abilities, paying extra attention to any particularly greasy areas.

  1. Let it sit overnight

Allow the baking soda mixture to rest for at least 12 hours, or overnight.

  1. Wipe the oven out

After 12 hours or overnight, take a damp dish cloth and wipe out as much of the dried baking soda paste as you can. Use a plastic spatula to help scrape off the paste as needed.

  1. Spray a little bit of vinegar

Put a little vinegar in a spray bottle and spritz everywhere you still see baking soda residue in your oven. The vinegar will react with the baking soda and gently foam.

  1. Do a final wipe down

Take your damp cloth and wipe out the remaining foamy vinegar-baking soda mixture. Repeat until all the baking soda residue is gone. Add more water or vinegar as needed while wiping to really get the oven clean and shiny.

  1. Replace your clean oven racks

Replace the oven racks and anything else you keep in your oven, and you’re done!


Go give that oven some TLC – You’ll thank yourself later.

Spring

Make Your Kitchen Spring Ready!

What pops to mind when you hear or see the word spring? For me it’s a feeling of freshness, a window of new beginnings and a great chance for ideas to bloom. This is a great chance to spice up your kitchen and give it that “Spring” feeling, don’t run away in fear this will cost an arm and a leg because it certainly doesn’t have to burn a hole in your pocket.


Get that feeling of freshness:

Starting small at a very low cost (or if any cost at all) Firstly, gather some flowers and a pretty vase that draws you in – this will give that feeling of a crisp, fresh feel. No need for a large, over-the-top floral arrangement… just a few stems will do the trick! Change it up with colours to compliment the season, here’s a few:

  • Lavender/Purple
  • Rapture Rose (Intense pink)
  • Sky Blue
  • Peach
  • Yellow

Just to name a few, feel free to incorporate any coloured flowers you like!

A window for new beginnings:

When was the last time you fully renovated your cooking utensils range? Swap out the cutting board that has seen better days and the plain plastic cooking utensils and replace them with ones that have a little more energy, Spring is also a great excuse to biff all your tea towels that have seen better days and replace them with new, fresh ones.

New ideas to bloom? I think yes!

Forget about making a huge investment – a small painting or framed quote is an affordable way to own a piece of original art. Get creative and visit your local opshop or even get one of the kids to paint you a picture!  You can frame it and then rest it on your benchtop, or even hang it up on an empty piece of your kitchen wall.

Bring the texture in

Wood and natural wovens are such a golden addition to any space, they add a bit of texture to the area and interest as well as warmth. Find a large bowl and fill it with fruit and your kitchen will be screaming its spring ready.

This is a few ways to get your kitchen in the spring season and will be easy to change when the next season is on the way! Some of these ideas can be incorporated with other seasons anyway

Color scheme

Most Included Trends In 2018 Designs

Most included trends in 2018 designs.

If you have just recently renovated or are looking into doing so, you’ll probably already know about these common trends everyone’s diving for in 2018 and we don’t blame these choices – read on to see what everyone’s hyping over!

Banquette Seating:

Believe it or not, this is an older trend which has rocketed into today’s trends and we aren’t complaining! This simple, yet practical idea has an edgy yet comfortable look and has more room for family/friends for that Sunday night roast or even a nice hot cuppa’ tea on that rainy day with your favorite book. With its space-saving design of bench seating made more sense than including a full set of table and chairs in the space of the kitchen.

Furniture historians trace the banquette, derived from the Germanic word for bench, back to 15th century France. Having seating is the kitchen was to have a concealed entry to secret passages that may have been located underneath banquettes in palaces and castles and was typically made from wood whereas nowadays they are made with cushioning and material to match your style.

Flat front Cabinetry:

We all want the simple yet elegant look but also still want to be able to open and close our cabinets and drawers, so this is where our push touch system comes into the trends of 2018 – no more catching your clothes on the edge of your handles, no more bumps and bruises on the children’s foreheads from running into the edge. Unfortunately, this design has no history behind it but take it from us that if you’re wanting a clean, seamless edge then for sure go for this!

Tile splashbacks:

While the kitchen splashback is a common aspect in many houses now, it wasn’t always this way. In fact, the modern idea of a kitchen splashback is a relatively recent invention, but where did this fantastic, practical idea originate from?

Like many common household features, the splashback can’t be traced to one single source. What we can confirm about the original splashbacks is that they came into use shortly after running water became widespread around the 1930s due to the advent of running water, kitchen innovations emerged swiftly, and the backsplash became a common kitchen sight.

Originally, backsplashes were about 4 inches high and were made of fragile materials like glass or tiles. Many were simply attached to the then-popular butler sink. When under-mount sinks rose to popularity in the 40s, splashbacks were no longer directly attached to the sink, so the only solution was mounting the backsplash directly to the wall. Over the following decade, the splashback became a popular place to demonstrate decor tastes. Around this time, the bright colors and creative patterns of the cement tile backsplash became the stylistic standard.

Even though the cement tile splashback rose to fame in the 1950s, it’s held up to the many home decor style changes over the years with ease whether it adds liveliness to a simple kitchen or accompanies a lively, colorful kitchen, the cement tile backsplash shines in just about every setting. In addition to its persistence’s, cement tile has proven to be one of the best materials for a splashback, why? Because of Its natural durability and easy clean-up is perfect for facing the splatters, stains of cooking. Over the years, production quality has only increased, so modern cement tile is likely to last even longer and hold to even more sauce stains, oil spatters, and splashes of water than its prototypes.

Mixed Metals:

This is such an elegant touch to incorporate into your designs to give the kitchen an edgy yet modern touch, there are different sorts of colors and finishes to choose from to suit your style like Matte black/white, polished chrome, brushed nickel just to name a few. There isn’t much history behind this one as it’s more so a design compliment for the finishing touches.

Multi-purpose islands:

2018 has just gone a step higher with trends and practicality has seemed to really boost up there alongside all the trends – this is a great example.

Shortly after World War II, popular home design shifted from closed floor plans to open concept spaces (sound familiar?) designed to make the work within the home more efficient and less labor-intensive. An expansive, wide-open kitchen meant that dinner could be prepared while children in the family room were in clear view. Once dinner was ready, everyone could eat in the kitchen itself rather than the dining room, making it easier for the cook to serve and manage the meal but with all the benefits an open concept floor plan presented, it came with challenges, namely a shortage of storage and counter space. Therefore, the kitchen island was born.

The kitchen island became a solution to space challenges, providing more surface area, storage potential, and a place for everyone to come together while others were cooking (plus, as we well know now, it also serves the purpose of separating the kitchen from living areas in absence of walls).

It is very popular to add in a cook top or a sink into your island now, but the options of design are endless! Come and talk to us down at Next Edition Kitchens to see what we can do for you!


Style trends come and go, so don’t invest in the latest look unless you love it. That said, highly-personalized or outdated style choices can limit the appeal of your property for resale.

For major renovation projects, it’s always a good idea to stick to the more neutral colors and classic styles. It will give your remodel durability and appeal to the greatest number of buyers when it comes time to sell. It will also give you flexibility to update your look in a few years without a total overhaul. Use non-permanent fixtures – like paint, furniture and accent pieces – to personalize the space and incorporate trendier choices.