Colour pallete

How to choose the perfect colour scheme

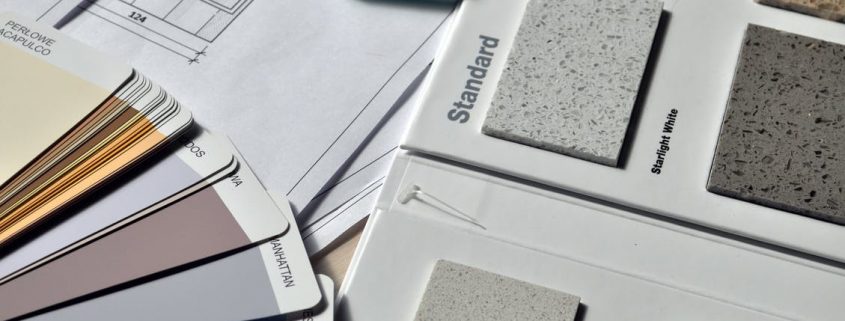
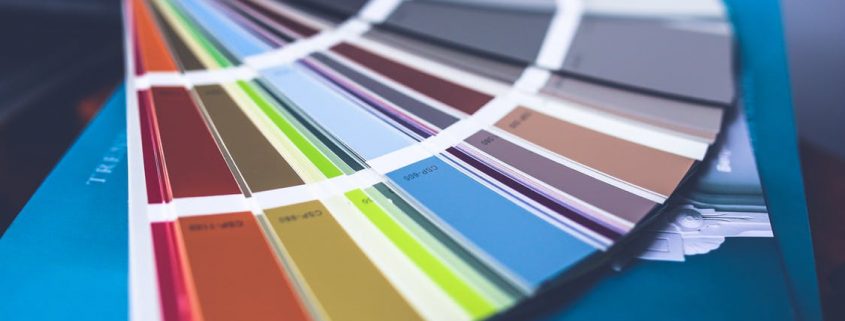
Ever walked into a kitchen designing studio with a fair idea of what you’ve wanted but seen the colour boards and gone blank minded? the amount of choices are insane but at the same time pretty ideal – with heaps of colours to choose from you won’t be needing to change much else.

When picking out the colors for you kitchen, your first step is to pick out two complementing dominant colors. Keeping these two colors simple will give you more opportunities to change up your kitchen over time without really having to change much more than the colours of the panels and possibly the benchtop. The third color should be an accent color that brings the entire room together while giving the room a little character. Personally, i believe choosing what colors you want in your kitchen definitely plays a role in choosing your personal style of kitchen.

For example, black and white kitchens are mostly categorized as modern. On the other hand, neutral colored kitchens are mostly placed in the “Standard” category where as the wooden kitchens are more so “Vintage”.
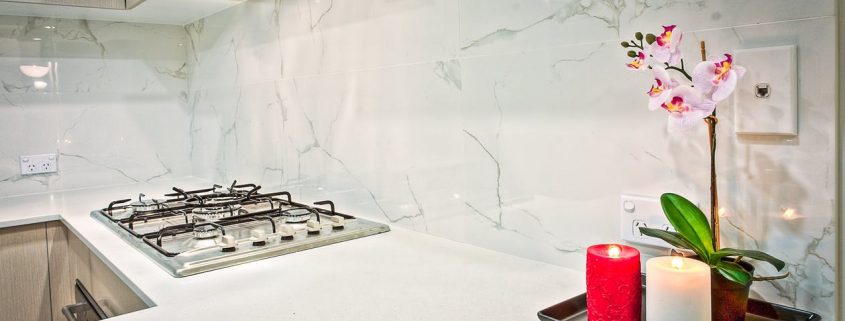
BENCH TOPS:

Pick your bench tops first, why?  because they can vary in color, pattern, and style making it hard to match any existing flooring and cabinetry in your kitchen. When picking your bench top, it is vital to think about the possibility of having a splashback in your kitchen either in the present or future, reason being is because you will be quite restricted with what colour you choose in some cases when it comes to splashbacks. Picking your bench tops first also allows you better match paints, stains, hardware, and custom finishes. Whether you choose granite, tile, wood, etc., your bench top is a signature piece in your kitchen – if you are unsure of how to make sure it is going to match your existing panels etc, talk to the bench top guys down at Northern Benchtops in Whangarei (very professional and passionate about what they do)

CABINETS:

Choosing your cabinet colours aren’t looked upon as such a tricky task if you have chosen your bench top colour then this will be a very simple decision – if you have gone for a grey bench top for instance, your walls are white then you could go with a misty grey colour which will link these all up nicely. Having an all white kitchen is very common these days as you can easily link white up with any colour while keeping that elegant, modern look, Darker panels look nice against the darker bench tops or suiting darker panels with a timber bench top would just look absolutely stunning.

 FLOORING:

Before you jump into picking colours, consider whether or not you will be changing the flooring – if not you need to choose colours that will bring this all together and not draw too much attention to your flooring. For example, having a brown tiled floor would not compliment a darker blue unit. Go see your flooring professionals (i recommend the guys at Floorcraft here in Whangarei – never seen a disappointed customer and they have produced stunning finished projects) let them know what sort of colour scheme you are wanting (make sure to let them know of all colours you have existing that will be staying in the kitchen and what colours you are wanting to include in the new one, try take samples if you can a lot of places will have free samples to take.)


I highly recommend going to your local bench top guys or a kitchen designing studio and also the flooring places to get that much needed opinion as you could stem your own ideas based on what they have stated, while also keeping in mind what will definitely not suit – sounds like a lot of work but you will thank me later! Trust me.


Northern Benchtops Whangareihttp://www.kitchenbenchtops.co.nz/

Floorcraft Whangarei – http://www.floorcraftwhg.co.nz/


Cupboards

Cleaning out those Cluttered Cupboards

Almost that time to do that dreaded spring clean? Don’t worry, de-cluttering can be a sad yet oddly satisfying time, getting rid of all the Tupperware containers you don’t use but still keep because it will defs get used (but let’s be honest, the only use it’s had is collecting spiderwebs and dust…)

I am always on the ‘procrastinating’ train for cleaning out my cupboards, every time I open them I’m pretty sure I could get lost in there! It’s pretty scary.

I have decided to share my knowledge after finally getting lost in my Tupperware & pots/pans cupboards (I found my way out after 2 days) on how to keep your cupboards up to date and spiderweb free – whether it’s the organization or some handy little DIY projects.

  • Going through my Tupperware cupboards I had to really ask myself whether or not I really needed 57 containers in a small corner cupboard just stacking up on top of each other, some with lost lids and some with cracks in them, now – I’m that person who will literally find any excuse to keep things (call me Whangarei’s #1 Tupperware hoarder if you will…) I pulled every single container out and decided what use is a container without a lid or one that’s about to split in half on me? I threw those ones away and there was already light beaming from the start of my cupboard, I organized biggest to smallest leaving the bigger ones at the back – I had matched them all up with there lids and you would not believe how much room I had – not to mention how clean and tidy it was!
  • If you are wanting to get a little more sorted on a new level of organized, I would highly recommend investing in a shelf called a “Lazy Susan” you can pull this handy little shelf out to avoid bending down all the time to get whatever you have put at the back of the cupboard and it avoids giving you that extra room to have things you don’t use hiding at the back awaiting that slim chance that it may get used. Another benefit of this is that it’s so easy to keep clean, who doesn’t like the sound of that?
  • If you are stuck on what you think you may use in the future – think back to when you last used that container/pot/pan, if you haven’t pulled it out of the cupboard and its looking like a spiders playground with all the cobwebs on it then definitely throw that away, or better yet – take it out give it a good clean and go donate it to the salvation army, this is very rewarding and it gets rid of those containers you don’t need!
  • Search ideas on Pinterest and Google on how to create special, dedicated little pockets to hang on the inside on the door to hold things like utensils/dish-washing brushes etc.
  • Have a garage sale, having a garage sale can encourage you to not only de-clutter your kitchen cupboards but a lot of the other areas in your house while also getting a little something back – fun idea to team up with friends and family!


Check out these ideas:

https://www.pinterest.nz/pin/255579347577140286/

https://www.pinterest.nz/pin/135882113733755469/

https://www.pinterest.nz/pin/417005246723758378/

https://www.pinterest.nz/pin/323414816964781794/

Splashback

Getting ‘Glassy’ in the kitchen?

Thinking about getting ‘Glassy’ in the kitchen? Then this is the article for you, we have created the top 5 reasons as to why you should consider this eye-catching detail!

If you are wanting to remove your current splashback and install another one here is how you would go about it:

While there are many ways you can do it I would highly recommend doing it the “Next Edition” way – we have tried and swear by this safe, easy and efficient way, Start by getting qualified tradies in to cap the pipes and disconnect the electricity. Once the room is isolated, remove everything attached to the walls including the tap ware and light switches.

Use a brick bolster and a mash hammer to remove the tiles. Start in the top corner of a row and work your way down and across. Use your wrecking bar if you need a bit of leverage. You want sure footing while you are working. So, keep clearing the broken tiles away as you go. In some older houses, tiled walls are backed with asbestos. If you come across any, stop work immediately and contact your local council for advice.

If you have a current glass one that’s silicone/glued on, you would carefully cut around the edging of the splashback and find a wee space to get a good grip on and carefully try to remove making sure the glass doesn’t break if possible, then any extra silicone left on the remaining surface you would either scrape it off or use some acetone to lift it off.

*Please remember to wear safety gear, gloves are a very much needed necessity.


  • No fuss installation:

Whether you want to do this yourself or get someone else in to do it for you – the end results are simple and stunning with no mess to clean (count us in!)


  • Long lasting Glass:

Glass can stand the test of time. And that’s why it’s ideal in the kitchen – a space that can really take a hammering over the years. Since splashbacks are made from toughened glass, they can stand against oil splatters, cleaning products, food splatters – that means you can cook up a storm without worrying about warping, blackening, fading or cracking & not to mention how EASY they are to clean, all you need is a bit of warm soapy water to get most of the food/oil/dust off and then give it a quick dry and shine it up with some glass cleaner.


  • A Statement to modernize your kitchen in a cost-effective way:

As we know, renovation can be lengthy and sometimes costly for some – we are constantly looking for different ways to suit our needs while keeping our wallets happy but also giving our kitchens a bit of glamorizing –  There’s nothing quite like the shine of a glossy glass splashback. Its reflective surface opens the kitchen space, adds a touch of luxury and splashes light around the room year-round. With only a couple of steps to install your splashback it is time efficient but also adds a statement to give that eye-catching detail your kitchen may just need.


  • A Splashback you can tailor to be your slice of paradise:

To create a custom kitchen that truly reflects you, the right colour palette is crucial. Luckily, glass splashbacks come in a rainbow of colours and shades – vibrant blues and reds, pretty pink, daring black, sparkling white, gorgeous green – and any other colour you can imagine, now-a-days you can even get as creative as possible and get a picture off google or you could even paint your own! The options are endless.


  • It’s a No to bacteria from Splashbacks!

Bacteria breeds in spaces such as the kitchen and bathroom, particularly on tile grout and in cracks. Since glass splashbacks are shiny, slippery surfaces with no grout, keeping bacteria away is no task for splashbacks!


After reading this article, have you asked yourself if it’s the next step for you but are questioning “where do I enquire?” head down to your local hardware stores and kitchen manufacturers who will gladly assist you with an offer you can’t refuse!

Easy-Peasy Quiche and Salad

Summer is slowly creeping up on us leaving our appetite for soups and hot roasts in the cooler seasons, now is the time you get stuck with ideas for healthy, easy and quick dinners.

Lately I’ve been working hard in the kitchen picking and choosing parts from each recipe online to create the perfect quiche of my own, after countless failed dinners turning into takeaway nights i was getting tired of not perfecting this summer goodie until i came up with this recipe – you better believe i was very stunned on how such a simple, easy meal turned out to be liquid gold!

All in all, here we have the PERFECT summer time favorite that you just HAVE to try, it’s quick, easy (and cheap!) besides, who wants to be stuck hovering over a hot element for 5000 hours in this heat? definitely not us!

What you will need:

400g Savory shortcrust pastry

2x Spring onions (Sliced)

3x Medium Courgettes (Sliced thinly)

1/2 Cup Sliced red pepper

2x Large mushrooms (Sliced)

150g Feta (Crumbled)

7x Eggs

1x Cup Milk (Or cream for a more creamier taste.)

1/4 Cup Chopped parsley

1/2 tsp Salt & Pepper

1/2 Cup Cheese (I recommend tasty)

2 1/2 Tbsp Olive Oil

250g Cherry Tomatoes

1 1/2x Handful of spinach


Directions:

  • Set oven to 180C.
  • Roll out the pastry on a lightly floured board. Line a 22cm quiche tin with pastry and cut off the excess around the edges.
  • Refrigerate for 20 minutes. Line the pastry with baking paper. Bake blind for 20 minutes.
  • In the base of the cooked pastry arrange the spring onions, rocket and courgettes. Sprinkle the feta over them.
  • Whisk the eggs, milk, parsley, salt and pepper, spinach, mushroom & Red pepper. Pour the mixture over the courgettes carefully and sprinkle with cheese.
  • Bake in the oven for 30-35 minutes or until set. Remove and let the quiche rest for 20 minutes before serving.
  • Put the tomatoes and oil in a small ovenproof dish. Season with salt and pepper. Bake in the oven for 10-15 minutes until softened and juicy.
  • Serve the quiche warm, topped with the roasted tomatoes.

And there we have it! Healthy, Easy & cheap! Also not to mention, it’s a real hit with the family – especially those ones who steer clear of vegetables (you can smuggle as many as you like in there they probably wouldn’t even know).. Easy-Peasy or what?


The Heart of the Home

Thinking of giving your home some TLC and updating but just don’t know where to start? Now-a-days the Kitchen and the Bathroom seems to be the heart of the house, these rooms make a statement about the age, style, standard and functionality of your house. In the end, you’ll not only have a beautiful kitchen to enjoy but also add significantly to your home’s value.

Holiday season seems to attract the most attention towards your kitchen so what better time to have a re-styled kitchen, right? I mean, what an awesome time to showcase all that hard work and those creative ideas, plus – imagine baking that delicious, family favorite Christmas cake in your new oven…

I have gathered some handy tips and tricks from the Director of Next Edition Kitchens who does custom builds, renovations (anything you could ever dream of really!) for when it comes to renovating because let’s be honest, the thought of all the organizing involved just makes you want to pull your hair out!

  • Know what you want – Style is everything, it can lift the mood and make being in the kitchen more inviting rather than a boring chore on your daily list of “things to do”– make sure you research current trends and previous trends and take bits and pieces of what you like and what you don’t like. Google, Instagram, Pinterest and Magazines all have some amazing ideas and inspirations.
  • Set a budget – When it comes to actually getting the renovations underway the scariest part can be the budget, it can throw you off a bit if you get prices back which is more than you expected to spend but if you pre-set a budget and let the designer or cabinetry maker know, they will try and keep it within that price range but also keeping in mind your style.
  • Practicality of the renovation – The definition of a renovation is giving a “facelift” to some of/a majority of your existing kitchen – also taking into consideration the most used aspects of your current kitchen, try not to change it up too much and to mainly focus on what’s going to make it your paradise while also keeping the practical, most used areas up to scratch with a bit of TLC . Sometimes, all you need is a fresh lick of paint and perhaps a nice splash-back while chucking in that wine rack you’ve always dreamt off… this could be a hint for bottles of wine to flow in for gifts? After all, what’s a wine rack without bottles to fill it up!
  • Who will be carrying out the renovations? Some people are very DIY and love to get their hands dirty amongst all the hard work but others are more on the designing side – if you don’t have much time to carry out the works or just can’t be bothered and would rather lax out on the beach and return to a lovely little surprise then definitely consider your options of getting someone else to handle all the constructing and installment, local & passionate joiners are the way to go, lets take Next Edition Kitchens for example – locally owned and operated, the team is highly qualified and very time efficient, they can custom build just about anything and are very flexible with great prices that won’t cost you an arm and a leg, did I just mention relaxing while someone else takes care of all the tiring work while keeping within or around your budget? Yes, I sure did!
  • When do you want it? Choose a date that won’t be the busy period, around early mid-year is the best time to renovate it gives you a lengthy period to make all final decisions (and make sure that the hubby or wife has given approval) getting feedback, changing your mind and also looking around for different ideas… this time of year also has the most free space opposed to getting a renovation all sorted in the New Year rush when everyone wants new kitchens for the family celebration, it gives you a sense of flexibility as well to work around your work hours or your hobbies that may require the most attention closer to the end of the year.

Don’t wait another day dreaming of what it could be and make it happen today – get inspired now, get a nice, cold refreshment (and maybe a few nibbles) make a list & grab some photos and head down to your local kitchen maker for a chat over some ideas!


Gardening with Children

Do you have ‘helpers’ in the kitchen? Getting kids involved with the preparation of food is a great way to introduce new, healthier foods to their diets. But it doesn’t have to stop with cooking, how about gardening with your children or grandchildren?

Building a vegetable garden is something that’s really simple and rewarding for the whole family.

Having the opportunity to learn where their food comes from children may even be more open to trying the what the food tastes like when it has been harvested.

All that digging, raking and pushing wheelbarrows can work up a sweat. Not only does gardening with children encourage them to be physically active, it also helps develop fine and gross motor skills.

It’s not just physical skills that gardening with children encourages. Children working outside together are encouraged to take turns with the range of tools provided. This means they must work as a team to reach their goal together- an essential skill in their social development.

There is a huge sense of achievement in gardening and it can be a great tool to build self-confidence. Watching plants grow from seeds and nurturing them provides children the perfect opportunity to connect with the environment.

Here are the top 5 vegetables to plant this season.

Salad Leaves

Courgettes

Beans

Tomatoes

Potatoes