Dark panels in kitchen - Grey

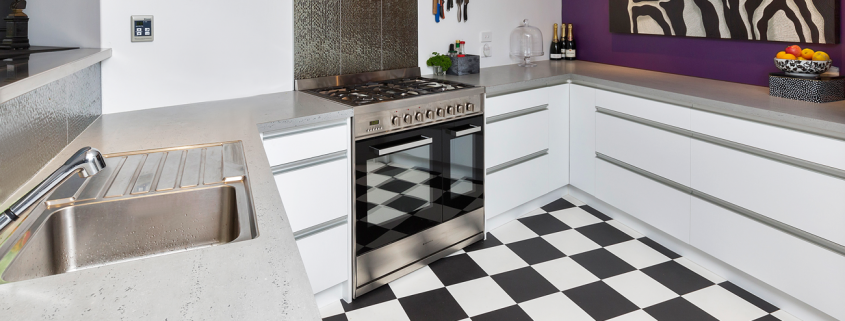
How to maintain those dark colored panels/benchtops

As gorgeous and elegant as dark colored panels and bench-tops are they can definitely become a challenge when it comes to finger marks, food splatters etc, a lot of people are hesitant to go with these colors as they want to avoid that nightmare as some would call it – but I’m here to tell you that it is not as bad as you think.

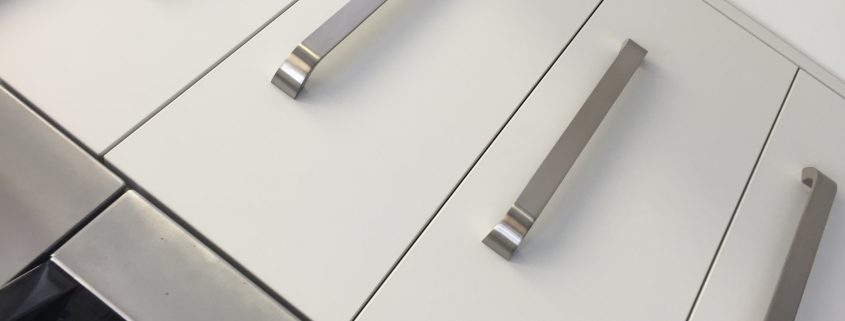
Whether it’s a matt, satin, semi-gloss or gloss finish, finger marks and water spills always stand out and can be hard to remove sometimes.

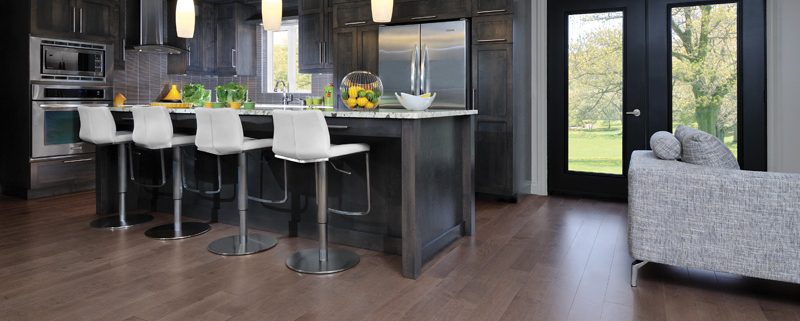
Because of the way the light reflects off a dark surface, the marks are often more obvious than on a lighter colour surface. If the mark is from an oily product, (for example oily fingers from cooking) removing this with a standard household cleaning spray can sometimes be ineffective as it doesn’t break down the oil. The other consideration is the streak marks that can be left behind by the cleaning product itself.

There is so many products out there people will try to upsell to you saying “it works wonders, cleaning will be a breeze” BUT this is not always the case – you’d be amazed to find how easy it is to clean up marks using warm, soapy water (you can even add in a dash of disinfectant to keep it hygienic but don’t use too much!) with a microfibre cloth – most times this will clean the cabinets leaving them nice and shiny with no marks whatsoever but sometimes, it can leave a water marks, the trick to this is actually window cleaner (it’s safe and leaves the clean look you’re going for.) On a laminate door, a mixture of eucalyptus oil and water in a spray works well to break down the grease and won’t leave streak marks.

*Always use a microfiber cloth when wiping your doors as this will avoid fine scratches from appearing (especially important if the door is a gloss finish). The best brand we have come across for this is Norwex as their ultra-fine fibers are incredible gentle yet extremely absorbent. You can find these down at our showroom or even online!

Regardless of the finish you choose, dark cabinets will generally be more work to maintain the cleanliness, however – by sticking to this cleaning guide, I promise you will be at peace with your lovely, clean outcome.

NEKL

Handles VS. No Handles

Are you in the middle of planning your next project and just can’t quite decide on whether handles would be the icing on the cake? Read on for some interesting pros and cons of each and my take on what is best for different styles, hopefully we can help you stop scratching and start the ball rolling.

As we know, Handles are becoming a very head-scratching decision to make now-days as there is so many different design ideas out there and lots of different styles to dash for. Some may not know, but the handle-less style was a reasonably popular choice for homeowners in the 1970s too; and now it’s gained popularity again, particularly over the last few years.

The main reason a lot of renovators decide to go for the push-touch drawers/cabinets with no handles is because of the seamless, elegant and TIDY look it gives off. It also enhances the use of the push-touch feature making it 100x more convenient for opening and closing in a quick, effortless manner. Renovators also love, love, LOVE the look of the flat, smooth surface.

Pros that I have been researching and can confirm is as follows:

  • Timeless style – The no handle look will never out-date, I mean look at the 1970’s statement I made before, it was such a popular choice back then and fast forwarded to now – they still are! It’s a win-win situation.
  • Safety – Have you ever had your children/grandchildren/siblings etc, come over and knock themselves on the handle protruding off your cabinet/drawers or have you ever walked past and its hooked onto a bit of clothing? Well – not anymore, with the push touch option, there is no obstacles in your way.

With pros comes cons, I have carefully researched and gathered some information from out knowledge (which is very little to no complaints):

  • Cost – you may think having no handles may be slightly cheaper because you aren’t adding the additional object to your kitchen, well not to be a buzz kill but depending on the option you choose, they usually cost 20-50 percent more than having handles. Reason being is the magical system the push-touch requires to function does come at a price, but don’t be scared away from the idea as it is still an affordable option and definitely worth investing in.

This isn’t to say that handles have gone completely off the cards because there are some very eye-catching handles out there that compliment the renovators project just perfect, handles are very beneficial in the aspects of having something to hook your fingers on in high places and those corner cabinets etc.

The pros for having handles is definitely the advantages it has for keeping your cleaning to a minimum – as you may already have guessed, having handles aims for having that one dedicated space to grab for when opening/closing the unit whereas, having a handle less, push-touch system it is more likely to get grubby finger marks all over the face of the unit as there is not one dedicated spot to press and open, it is free for all some may say and you can virtually push anywhere for the system to open/close which means, grubby finger marks EVERYWHERE!

  • Cost – As stated above, having handles can be cheaper, not always as some different handles of course come with a different price but there are so many good bargains on some exquisite handles out there just screaming that it’s the icing on the top of your project.
  • Styles – There are many different styles and colors of handles out to literally suit everyone’s style/taste. In my opinion this is a great advantage as they will always be in trend its just the style that will vary but they are easy to replace and again, can be quite the bargain while keeping the illusion of elegance or even quirkiness!

Cons:

  • Trends – this isn’t really a big deal if you aren’t too worried about trends going in and out but for those who love to keep up with the trends then handles may not be complimentary on that aspect with styles continuously changing, if you do happen to love your trends and styles then this method of having handles can be costly with replacing etc but do again keep in mind there are plenty of bargains about! A lot of handle styles tend to stay in trend for awhile – i’m talking years and given the era we live in, they are all pretty similar to what new designs come out in some way.

I hope we have helped minimize the head scratching decision in some ways with detailed information on each option, we know it’s a tough choice to make but we can guarantee that either option, your project will be looking exquisite – if you are still hum-ing and harr-ing go down to your local joinery place, we will take in all aspects like your personal style, what look you’re going for and of course, your budget.


Carrot Cake

Never Fail Moist Carrot Cake

Who likes Carrot Cake? what better time to start making this delicious treat for Easter time?


Ingredients:

  • 3x Eggs
  • 2x Cups brown sugar
  • 1x Cup oil
  • 3x Cups grated carrot
  • 2 1/4x Cups of high grade flour
  • 1/2x Cup milk (Warmed)
  • 2x tsp Baking soda
  •  1/2x Cup walnuts (if desired)
  • 1/2x Cup Crushed pineapple (Optional)

Preheat oven to 160°C bake. Beat eggs and Brown Sugar together.

Add oil then all other ingredients – mix well.

Pour into a large, well-greased cake tin.


Bake for 35 minutes, until a skewer inserted comes out clean.

Stand in the tin for 20 mins then turn out and cool on a cake rack.

Spread with cream cheese icing when cold.


Cream Cheese Icing:

  • 50g Butter- softened
  • 1/2x Cup cream cheese
  • 2x Cups Icing Sugar
  • 1x tsp Vanilla
  • 2-3x Tbsp milk to mix

Put icing on when cake is cool, store in a container in your cupboard to keep moisture.


Feel free to customize this recipe to suit your taste, it’s certainly a family favorite that won’t go to waste!


Utensils - Organised kitchen

How-To Organize Your Kitchen EASILY

Is your kitchen well overdue for some re-organizing? No matter how much room you may have (or may not have) in the kitchen – it is do-able to have a lovely, organised kitchen that won’t give you nightmares.

We are always on the hunt for a magic answer or even a cleaning fairy that would come around each day and have everything clean and organised with the flick of the wand before we get home, if you are sick of searching and dreaming of the day this will come – read ahead and get all the exclusive ideas from the professionals (and tricks and tips that ACTUALLY make life 100% easier when keeping the kitchen in pristine condition!)

Step one – start from scratch by pulling everything out of cupboards and drawers, one-by-one otherwise you’ll get lost in amoungst all the food & cooking utensils (this is the part where you can get the kids involved or if you prefer it by yourself, go for gold.)

After everything is pulled out, wipe down the shelves and drawers – you’ll be surprised how much dust builds up over time.

Start by putting the least used utensils in the bottom drawers and things like canned foods at the top of the cabinet as these seem to last longer and aren’t everyday things we may tend to grab for when we open the pantry make sure you remove things that may not belong in the kitchen (we all have the fruit bowl that’s filled with everything BUT fruit) – then as you go down, try placing all the everyday necessities in the middle shelves as you will find it easier going into the cupboard, grabbing what you need and placing it back especially if its right in front of you (we are all human and find this the fastest and least time-taking method) right at the bottom should be a shelf for things like your potato box or even bigger appliances.

***Be sure to check expiry dates on all food before you place it back in cupboards as you may have something dated from 2001 that you never knew was hiding away in there.***

Step two – Put things in the exact same spot after use, this will help keep the organisation in place and will get you familiar where everything is along with your family catching on as well (there will be no excuse for them to not dry and put away dishes anymore!)

Step three – Keep your purchases (unless its food, of course) to a minimum, if you already have all the needed appliances then really think about future purchases, ask yourself “How many times will this actually get used? Is it going to replace any appliance I already have that may do the similar thing? Where will I store this? Etc.” try avoiding purchases that are only going to be used very rarely – ask  your friends and family as they are usually bound to have one you can use.

Step four – Pinterest organisation DIY ideas, this has been my saviour and has some wonderful ideas for storing many different things in your kitchen which makes it look tidy while keeping it all out of the way.

Step five – Always keep up to date with kitchen renovation ideas, kitchen renovations can be costly but they can also be great for a budget, when you slowly renovate the kitchen bit-by-bit you’ll be saving money and time with making the most of what you have with possible DIY ideas to temporarily add on to your kitchen and these ideas can simply be buying a couple of stick on hooks to place inside your cabinet door to hold numerous kitchen utensils – the benefit of exploring these cheap (yet fantastic, budget friendly ideas) is that you will slowly make these more of a permanent add-on and find what works for you as you could then go to Next Edition Kitchen’s or your local cabinetry place and get a hook rack custom made if the stick on hooks are working well for you.

It’s all trial and error but it’s a very good idea to get into.

With doing DIY ideas, you can get the family involved as well and have some fun while also teaching them important skills and encouraging organisation to be up-kept in the kitchen which will pan into all areas of the house.

So, what are you waiting for? be your own cleaning fairy and be the envy of all your friends and family with the cleanest kitchen ever laid eyes on!

Bath

5-Star Spa Treatment in your own home!

It’s almost the end of February and let’s be real, we could all use some pamper time… Imagine having a 5-star spa experience in the comfort of your own home, good news! No need to imagine with our simple guide on how to transform your bathroom into a spa treatment room with no fuss and your wallets will thank you and us on this one.


Begin with clearing the clutter lingering around taking up unnecessary space, nothing invades relaxation like a cluttered-up mess with all sorts of bits and bobs you didn’t even know how it made it’s way into the bathroom in the first place.

Spend a reasonable time making sure all the surfaces are wiped down and the cluttered items put in the correct places.

Fold 3x towels and have a nice light-weight dressing gown (or fluffy, depending on mother nature’s decision on the weather that day!) awaiting you on a clear space in your bathroom.


Now that your bathroom is spick and span – lets move on to setting the scene of your very own 5-star spa setting, get some tealight candles (or even scented candles.) scatter them safely around the bathroom where they won’t cause a hazard and light them when ready.

Leave the lighting on low if you can and if you have some incense or room fragrance, give your room a spritz to help set the spa-like scene.


Make a playlist of soft, contemporary music – or whichever music relaxes you best or even have a nice book handy.

Start the process by running a nice, warm bath while adding in your favorite bath salts, bubble bath etc. Exfoliate your body with a salt scrub or loofah. Use circular motions towards your heart all over your body to increase circulation and reduce cellulite.

Once you’re all scrubbed make sure to apply a nourishing lotion. Use a towel to pat your skin dry, then seal in the moisture by applying a lotion or body cream, a lavender scented one would be very relaxing! Pour yourself a glass of fresh, ice cold lemon water (or whatever taste of drink you love) and let your troubles melt away.


Now that your body is relaxed – the pampering can begin. Start by washing your face with luke warm water and your desired face wash, gently exfoliate your skin with some exfoliator (this step is optional, but it will really treat your skin to a 5-star spa experience.) rinse off with COLD water and now’s the fun part… FACE MASK! Being a previous qualified Beauty Therapist I have undergone studies to suit different skin types but there is one face mask you can make from home to refresh, soothe and smooth and suit ALL SKIN TYPES and as follows:


  • Combine 1/2 cup hot—not boiling—water and 1/3 cup oatmeal.
  • After the water and oatmeal have settled for two or three minutes, mix in 2 tablespoons plain yogurt, 2 tablespoons honey, and 1 small egg white.
  • Apply a thin layer of the mask to your face, and let it sit for 10 to 15 minutes gently wash off and moisturise.


Feel free to treat yourself to other treatments like a manicure, eye mask or hair mask, whatever you need to do to feel pampered. Relax for as long as you wish and enjoy the peace and quiet.

Kitchen

Old kitchen trends that have made a comeback

We all knew this would happen at some point, lets just say living in the 70’s and beyond looked to be a creative era and in this aspect it’s making a huge comeback that everyone just loves, look no further than the kitchen, where a variety of once relived kitchen trends are stealing the spotlight again and leaving us in question as to why they ever left.

1. Pull out chopping boards – We’ve all been in an older kitchen and noticed a little drawer which pulls out to be a chopping board, reason why we love this is firstly, it has it’s very own storage sorted out (no excuses for misplacing it in the wrong cupboard/drawer) it’s got many uses for different design ideas –  one that i like is having one above your pull-out bins as you can have a hole cut into the edge of the chopping board so when you finish cutting food up there’s a little long-drop for your scraps, how easy would cleaning that up be!?

2. Colorful Cabinetry –  Once upon a few years ago (we’re talking 50’s, 60’s and 70’s) kitchens would be in a range of colours – red, green, blue, yellow, pink, orange, purple you name it, these where the normal. Venturing in to the coming years a lot of wood finishes came into trend pushing the colours aside and then the whites an your more natural colours shined upon our designs and was the most common colours (still is to this date) but now….. colour has made a fast approached comeback and the colours aren’t so bad, they are more subtler than the ones from the 50’s, 60’s & 70’s (we promise)

3. Shiny kickboards and handles – I’m not saying every kitchen had this feature but some of them did, the handles would come in many different, antique looking styles which we still have a few around today so this comeback wasn’t much of a surprise BUT we love the look so we thought we’d mention this one too.

4. Tiled Splashbacks – Tiled splashbacks were a more DIY job for making your kitchen look a bit unique and spruced up, there’s no denying how cost efficient this was and the outcome had everyone blown away as it was seen as “creative” and “quirky” – this has made an extravagant comeback as it was slowly introduced by the textures glass splashbacks are offered in.


So now we come to an old but new era yet again, it’s one we’ve all been waiting for so we can shine our true colours with creativity and bring back some good old childhood memories.

Whats your thoughts?


Why Drawers are the Next Addition to your Kitchen

The average, standard kitchen was generally constructed with more cupboards opposed to drawers, you’d have the odd set of drawers chucked in the design here and there, but people found cupboards to be more “efficient” and “roomy” you could say – this old design method just isn’t cutting it anymore and I’m here to tell you why.

If you’re considering a kitchen renovation or a brand spanking new kitchen all together, I’m here to convince you that EVERY kitchen should have drawers – not overloaded with cupboards. If you’ve already got drawers in your kitchen, all you need to do is read on and feel awesome.

So the reason I felt the need to share this post with you was from my ideas of renovating my own kitchen and seeing some designs of all the modern looks around – a lot of kitchens are being made with more drawers opposed to those pesky cupboards that make you bend down and reach into the corner of darkness (or if you’re short like me, reaching up with all your power on your tippy-toes to reach the plates… trust me – it’s a mission.) why drawers? Seriously, why are drawers suddenly taking the limelight? Well, from my research and various (probably annoying) questions to Ryan himself I found out exactly why, after reading these benefits you’ll in my boat with wanting drawers!


  • Easy Access

Do you remember my post about ‘decluttering your cupboards’? well let’s just say you won’t be needing to get lost in the back of that overfilled (very messy) cupboard that hardly closes because it’s just jam packed, drawers solve this problem perfectly, even making the objects in the very back easier to grab without having to pull everything out.


  • Organization made a breeze

The space inside most cupboards is pretty much just a giant box which can often cause a terrifying jumble of containers, pots/pans gone wild, with drawers you can add dividers which can keep everything separate BUT all in the same spot AND you can’t get lost in this one!


  • They’re the only way to go if you don’t have over-hanging cupboards

If you like the look of a kitchen without upper cabinets, drawers are pretty much the only way to go. Imagine, for a moment, trying to cram bowls and plates and glassware into a doored cabinet. Not ideal in my opinion.


  • They’ll amaze your friends and family.

We’re not saying you should redo your kitchen just to make your friends and family jealous, but can you imagine the look on their faces when they realize your bottom storage features drawers instead of cupboards?

Having drawers is the modern style, while keeping the look modern you are also creating more space and keeping it all tidy and organised – I’m still in love with the idea of cupboards in a kitchen and they most definitely work for some people, but drawers have won my vote – especially because you can get different sizes of drawers that can hold anything, like literally cups, plates, cutlery, pots/pans, cleaning gear, food, wine…

Instead of having to get down and dig through the back of a cabinet, you just open it up and gently choose from an organized array. Drawers make you feel like you live in Gordon Ramsay’s kitchen – now come to think of it, where can I get a Gordon Ramsay after I install those drawers?

Granite

All you need to know about Granite

Tough, practical, beautiful.. no wonder Granite is the top choice for stone benchtops..

For those who are interested in granite, granite is an igneous rock with between 20% and 60% quartz by volume, and at least 35% of the total feldspar consisting of alkali feldspar, it is a incredible hard-wearing stone (ideal for kitchens) the price ranges from rarity of the stone and where it originates from also the labor involved in manufacturing this to suit any design – makes it more of an investment than a cheap fix.

Granite is produced naturally in a variety of colours this will always depend of the mix of quartz, mica & feldspar.  So, a wonderful range to choose from!

To achieve different finishes, the stone’s surface is worked with diamond pads, starting with the roughest and getting finer until the required look is produced. A high-shine, polished finish brings out the brilliant colours and shine which comes from the reflection of the stone’s crystals.

For a contemporary honed finish, polished stone is buffed to create a flat, low-sheen surface. Sandblasted granite gives a raw, textured surface. This is more porous than a polished surface and is not suitable for hardworking areas.

Clean granite with stone soap or a mild dish-washing liquid diluted in warm water. Use a clean, soft cloth, remove the detergent from the surface with a second cloth soaked in cold water, then wipe dry. Blot up any spills before they soak into the surface


Now, you’re probably wondering what the pro’s and con’s are to this magnificent product? well here goes:

PROS:

  •              Granite benchtops don’t d­epreciate in value.
  •            It’s a one-of-a-kind, natural surface that has an almost luminous look.
  •             Granite adds value to your home.
  •            It’s sanitary — bacterial contamination is not a problem with granite.
  •             Formed by heat and pressure, it can take the heat of a pan.
  •             It’s easy to clean with warm water and a mild detergent.

CONS:

  •         Granite benchtops last forever. If you get tired of the colour, you’ll either need to learn to live with it or rip out the entire counter, because you can’t change the colour.
  •          Each slab of granite is different, so it may not be a good choice if you prefer a completely uniform look.
  •          Granite itself is expensive, and the labor-intensive installation can run three times more than the cost of the material.
  •          Granite can be permanently stained if you seal it with a pre-existing stain.
  •          It can crack when hit by a hard, sharp object like a meat cleaver.
  •         Because it’s so heavy, granite often requires additional structural support, especially in spans and cantilevers.
  •          Once glued onto the cabinets, granite is quite difficult to remove, and may result in damage to the cabinets.

Here’s a link to our main supplier of granite benchtops – here you can browse through the different colours and find out where they are from, there also some finished projects on there too (don’t be afraid to pop down to their showroom and have a chat! they won’t bite!) https://www.stone.co.nz/

Cinnamon

Tasty Cinnamon Rolls

I was digging around my recipes and i found this fine little gem, i had made it on the weekend and they lasted all about two days before they were gone out of sight! very popular i will definitely making some more this week! keep reading to find out how to make these tasty Cinnamon Rolls.


For the Dough:

2x Cups self-raising flour

1x pinch of salt

90g Butter (cubed)

2/3 cup of milk


For the Filling:

120g Butter (softened)

4x Tbsp brown sugar

2x tsp cinnamon sugar (or half cinnamon powder and half white sugar)


For the Icing:

1x Cup icing sugar

1 1/2 Tbsp Boiling water


Directions:

1. Preheat oven to 180°C.
2. Sift flour and salt into bowl, then rub chopped butter into flour using your finger tips.
3. Make a well in the centre and add almost all the milk. Mix lightly to make a soft dough (add the rest of the milk if necessary).
4. Knead dough on a lightly floured surface until smooth.
5. Roll out dough to a 25 x 40cm rectangle of 5mm thickness.
6. To make the filling; beat the butter with Brown Sugar and cinnamon sugar with electric beaters until light and fluffy. Spread evenly over the dough rectangle.
7. Roll up dough from the long side and using a sharp knife, slice the dough into 3cm pieces.
8. Place scroll pieces into the holes in a muffin tin, greased tray cut-side up. (Avoid using a baking tray, as the contents will leak/spread).  Cook for 20-30 minutes or until golden.
9. Drizzle with icing.
10. To make the icing; combine Icing Sugar and boiling water in a small bowl beat until smooth.

Get going in the kitchen and give this a tasty treat a try, grab the kids and get them involved – such a rewarding activity that everyone will love!


P.S Take a photo and let us know on our Facebook page how great these were.