Posts

Composting

How-to: Maintain a compost bin

Do you have a garden and have been thinking of incorporating a good ole’ compost to the mix? this is such a great idea if you are after a little project to keep you busy and an added bonus is that your garden will thank you with delicious fruit, vegetables and flowers that have been absolutely soaking in all the nutrients from the emptied compost.


What exactly is compost?

Compost is simply decomposed organic waste from mainly food scraps. It is nature’s way of creating an added boost to crops and general gardens. All you need to keep feeding your compost is your kitchen food scraps and even garden waste – how easy? in just 2 – 3 months your supply will be at the stages of an ongoing steady fertilizer that’s packed with nutrients for your garden.


What type of compost bin is best?

A plastic bin in which you can purchase from your local hardware shop is perfect for your smaller compost to scale but if you are wanting a larger to scale bin, go for the wooden ones. You can build a bin yourself from googling a DIY step-by-step guide. You can also just start a heap on the ground but the choice is totally up to you!


Where do i place my bin?

It is a good idea to place the bin in place away from the house. it will need to be sheltered by intense heat and wind.


Making the compost:

Once you’ve decided where you’re going to place your compost bin, it’s time to get started with the fun stuff.
Add your organic material in layers to create a balance of carbon and nitrogen.
Start by doing a layer of carbon – your brown material: dried leaves, twigs, newspaper etc. Next add a nitrogen layer – your green material: plant trimmings,
grass clippings, anything green and leafy.
Adding a product like lime to each layer as you prepare your heap will accelerate the composting and help neutralize acidity, plus it has the added bonus of helping to keep flies away. Keep adding alternate layers, then add water and cover the heap to enable it to decompose quickly. Compost needs to be turned regularly to aerate and help the decomposition process.
What NOT to put in your compost:
-Tea and Coffee Bags: If you are wanting to place Tea and coffee grounds into your compost, that is absolutely fine but please make sure you do not put the bags in aswell – these bags generally contain synthetic fibers that do not break down in a compost pile and can contain some iffy chemicals you do not want in your soil.
Citrus Peels & Onions: While fruit and vegetable scraps are the main ingredient to making some fantastic fertilizer there are some food scraps you should steer clear from your compost, these include Orange peels & Onions the reason i place these in bold is because it is such an easy food scrap to slip past you and weasel their way into the compost bin, perhaps placing a sign on the compost bin to remind you not to put them in would be beneficial?
Unfortunately, the natural chemicals and acidity in orange peels and onions can kill worms which of course slows the process down as the little worms and other microorganisms actually really con tribute to the outcome of your compost. Plus, unless you take time to cut everything down into smaller pieces – they take longer to decompose which results in a longer wait until you can use your fertilizer.
Meat & Fish: These will of course, decompose fine and have nutrients that would be a good addition to your soil, it will unfortunately attract rodents like Mice, Rats, Cats, Dogs etc who would carelessly ransack your bin to eat them.
The smell of decaying meat may annoy you and possibly your neighbors as well!
Coal ash: The ash left from the fireplace should most certainly not be added to your compost pile, it contains quite a significant amount of sulfur as to make the soil excessively acidic, which we can confirm will harm your plants. Wood ash can be added in small amounts but do not add coal ash!
Sawdust from TREATED wood: While untreated, natural wood sawdust can be a great addition to your compost pile. The reason that treated, polished and vanished wood is not a great addition is because the toxic compounds wont be able to break down in the compost process and can negatively affect the microorganism activity and plant health.
-Large branches: Large branches and twigs will take forever to decompose which in conclusion will slow down the process, it may be a bit of a pain to lengthen the process by cutting them down to be smaller but it will allow you to use the compost for your garden a lot quicker. The smaller the branches, the quicker the breakdown cycle is.


Alternatively,  you can start a branch pile at the back of your house where its purely dedicated to branches, twigs etc which will decompose over the course of a couple of years. A branch pile is however, a great habitat for smaller rodents.


Added on tips:

  • Always keep your pile damp but not saturated.
  • If you are adding food scraps bury deep in the pile.
  • Do mix your lawn clippings with your food scraps, grass tends to compact which may prevent the air flow through the pile.
  • Ensure you compost gets some sunshine but not too much.


Appliances Blast Back To The Past

As you may know, I am a sucker for a good history throwback and seeing how much we have changed and evolved from back then.
Come the holidays, we always start to spend as much quality time as possible with loved ones, especially in the kitchen preparing the mouth-watering lunch and dinner for all. This year round made me really think about what it was like when my mother was me helping her mother prepare the delicious feast and what sort of appliances and cooking utensils they used.

Upon my conversation while cooking with my mother about what it was like back in the day really got me interested in doing some research and WOW, did the results just become the most interesting find yet?!

While the traditional pavlova recipe or nana’s special fruit cake recipe remains, the appliances they used to use to whip these up have majorly shown such a difference when comparing what we use today VS. what our loved ones used when they were little.
Let’s dive in and explore some exquisite finds that really WOW’d me:

1. The Naxon Beanery – This was every households necessity (no, seriously – this appliance was the bee’s knees, so versatile and easy!) We know this to be the “Crock-Pot” this was developed by Irving Naxon as a means of recreating his Grandmothers bean soup, the Beanery was transformed into a more versatile status appliance which was then seen overall as a slow cooker. In 1971, the Chicago-based manufacturer was bought out Rival, who renamed the plug-in pot the Crock-Pot.

Naxon Beanery

Naxon Beanery


2. The Salad Spinner – As you may have already noticed that you still have one of these in your cupboard and it isn’t quite an out-dated utensil – this one is still such a great invention, my mother advised that this would come in pastel/fanta colours and pastel greens and it would be her or her siblings job to sit on the floor and spin the handle like mad until the lettuce was dry. Not only were the colours fun but also it did resemble a toy as such which made it easier to convince the kids to help out!

Salad Spinner

Salad Spinner


3. The Ice Crusher – It’s no secret that cocktails where all the rave and at its peak in the 1950s. Here, we have the handiest device that would crush your ice cubes to make a lovely, cool & refreshing slushy-like beverage.

Ice Crusher

Ice Crusher


4. 2-in-1 Electric Can Opener and Knife Sharpener – First of all, how did these ever go out of fashion? Seriously, how great is this invention. It is super practical and easy to store for when you don’t need it. It did used to have a horrid grinding noise when you would sharpen knives but for the design of this beauty, chuck in a couple of ear plugs and get sharpening your knives and opening your cans with ease & style! (It was even electric!)

Electric Can Opener & Knife Sharpener

Electric Can Opener & Knife Sharpener


5. Elevated Cabinet Fridge – Wait, did you say HANGING FRIDGE? Another design I’m totally in love with for what it used to be, I think this design was a very practical idea to have all food being incorporated into the layout of cabinets opposed to free-standing, you’d have to have some strong screws in there to hold it up!

Elevated Fridge

Elevated Fridge


6. Fridge Wraps – Ever looked at a white fridge and thought “You look a wee bit plain, lets spruce you up!) well, our family living in the older generation hit the nail on the head with a range of patterned designs to stick on the doors of your fridge, retro right?!

Fridge Wrap

Fridge Wrap


The list goes on & on & on for so many cool, older style appliances and even cooking utensils. It really does amaze me of how much we have evolved into what we use today and the style of things, hearing about my mothers childhood cooking stories and all the different things you don’t see so much anymore is truly eye opening so i hope you enjoy this post and it takes you or your elders back in time to reminisce.


*All photos are NOT owned by Next Edition Kitchens.

Lights

Lights In The Kitchen Guide

Lights in the Kitchen can be tricky with the different types of lighting out there as an option but with the help from our designers, we can help point you into the right direction.

Every kitchen deserves its own personal complimentary aspect to highlight what a breath-taking project it is, whether you have just done a few renovations/DIY upgrades to what is current or even having a newly built kitchen – this is why lighting in the kitchen is a great opportunity to take on.

Having the kitchen complete and fresh is like you are floating on cloud 9, you come to realize all the effort, time and money gone into achieving this so why not somehow emphasize all that hard thinking and decision making, the cost of material and also the hard work gone in to getting the job done? Lighting in the kitchen is the answer and not only is it stylish – it’s also very practical.

Having a lighting plan in your kitchen can make the chef’s life an absolute breeze with the bright task lighting, for guests to socialize with a lovely calming and elegant ambient lighting, lastly, we can’t forget lighting for the well-thought-out architecture of your kitchen to really shine with accent lighting.
Together, these lighting layers will show off all your kitchen has to offer.

Ambient lighting:
This is like no other lighting that can come from such a pure, organic source that is free: the sunshine! Early mornings usually greet you with a slap in the face of sunshine (a good slap in the face) this is always enough to fill each room everyday apart from when the sun says goodbye for the day and the darkness creeps in.
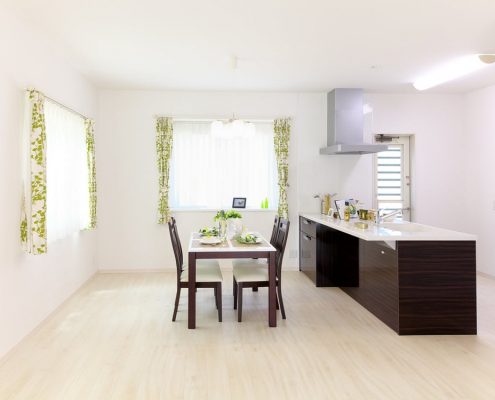
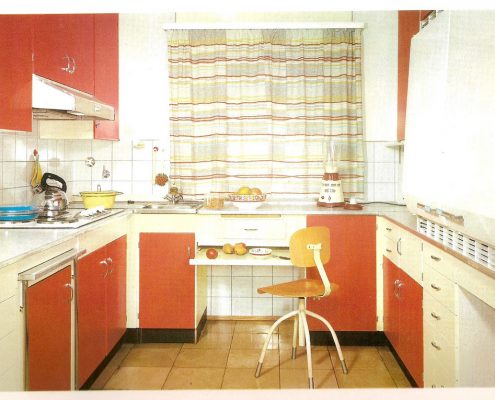
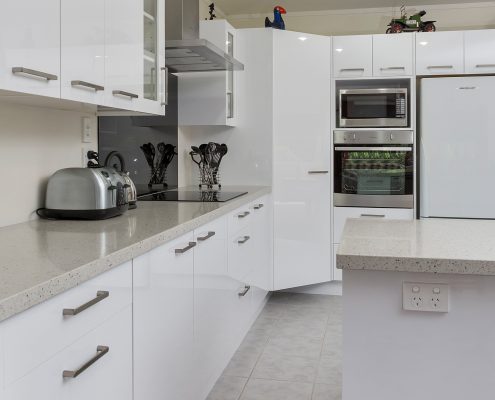
The right ceiling lighting can be utilized to give off just the right amount of illumination needed. The specific types of artificial ambient kitchen lighting include (but are not limited to) chandeliers, pendant lights, recessed lighting and flush mounts.

While ambient lighting is used to make it easier for you to navigate throughout the kitchen, it often leaves shadows in areas that require more focus. With the help of task lighting, work surfaces and cabinetry are properly illuminated so you can safely prepare meals, read recipes, and easily spot ingredients on a shelf.

What is Accent lighting?
Accent lighting focuses light on a particular area of the room or an object. It is often used to highlight art or other important displays. Common types of accent lights include wall sconces, floodlights, recessed lights, torchère lamps, or track lighting. The brighter light from the accent lamp creates a statement to any room.

We recommend puck lights to really emphasize nicely those glass front cabinets, much like in a china cabinet or your end cabinets.

– Toe-kick lights to gain attention on flooring that have some sort of texture or design. They are also very helpful to those who like a midnight snack but don’t want bright overhead lighting waking them up.
– A table lamp on the bench-top adds a lovely glow to give that illusion to soften the hard surfaces of a kitchen. This looks great in the more quieter areas of your kitchen, keeping it away from the prep stations and kitchen sink.

Task lighting:
Task lighting is exactly what it sounds like: lighting to help you accomplish the tasks you set out to do in your kitchen. Whether it’s preparing meals, washing dishes, paying bills, or helping kids with homework, all of these jobs would be difficult to complete with poor lighting. Task lighting sources include:
– Recessed or “can” lights – We strongly advise placing one over the sink, one for every four feet of bench-top space (at a minimum but is not limited too), and also over the island, if not using pendant lights.
– Pendant lights over the kitchen island serves three purposes, they allow the practicality to be at a high level for task lighting, they make a perfect design statement, and also they compliment areas that need to be distinctive (your smaller spaces) without going over the top.
– Under-cabinet lighting, in the form of compact fluorescent lights, is another great option for task lighting in the food preparation areas.

When I asked our Kitchen Designer her input on how important lighting is, she gave us an awesome explanation: “Lighting completely changes the look & feel of a space. It is one of those design elements which often goes unnoticed when it is good but is glaringly obvious when done poorly! When choosing the correct lighting it is really important to consider the space is used – where in the kitchen will you be working the most? Will shadows be created if lighting is positioned behind you?

Strip lighting is a great option for under upper cupboards whilst LED down-lights are the best option for overhead lighting. Don’t forget about pendant lights & wall sconces which will add key lighting to high use areas- not to mention adding style & interest to the overall kitchen design.”

Common kitchen task lighting options include:

– Strip Lights: Versatile and great for illuminating a cabinets interior, especially low cabinets that hardly receive any ambient lighting. LED strip lights are also used under the cabinet to fully illuminate counter spaces.

– Puck Lights: Round and oval, puck lights are great mood lights and can be used to illuminate countertops in the form of a scallop, spot or pool of light.
If your kitchen is particularly well-designed the right placement of accent lights can be really complimentary and help really highlight your favorite elements.

Common kitchens accent lights will include:
– Dimmers: Having a dimmer switch allows you to progressively transition between the levels of lighting which would range depending on the different tasks in the kitchen. This option is energy efficient and very versatile.

– Motion Sensors: This option can come across as very intriguing and a great idea for the pantry and smaller areas, how many times have you turned on a pantry light and forgotten about it? This option is very versatile and stylish at that.

All-in-all, the kitchen is the magnet for socializing, cooking, and entertainment; all activities that thrive with a generous level of lighting to accommodate each activity. By following the guidelines of light layering, finding the right fixtures and controlling them properly, your kitchen is sure to always wow you and your guests.

Bathroom

Bathroom Vanities (History included)

What’s the first thing you notice when you walk into the bathroom? to us, the vanity is a key focal point of the bathroom.

When you enter a well design bathroom the vanity usually is the eye saw area your eyes dash to but it is also very essential for storage means. Investing in a upgraded vanity with a professional will leave you stress free and liking LOVING the bathroom even more.

At Next Edition Kitchens, we incorporate all aspects to your style and also always consider the space we work with to present an exquisite design that will leave you speechless.

When it comes to bathroom vanities, to us – it means more than just designing a stock standard bathroom, it is a room in the house that you use frequently, sometimes briefly and other times for a  nice and peaceful time to relax and wash up – we aren’t just designing your bathroom, we are designing your very own bathroom sanctuary! practically to us is also very important so whatever your style or requirements may be, we can certainly do it all.

Sprucing up the bathroom vanity really can uplift the room and make it seem like a new bathroom, however – you need to consider the following when planning:

  • Sizing – One of the most important (and probably obvious) aspects is of course, the dimensions. The correct sizes are crucial, you don’t want something that is too big and overcrowds the space. In contrast you don’t want something that is too small for the space.
  • Storage – Storage in your bathroom is also very important, really evaluate how much storage you need in the bathroom along with the style of it, when you come to us to help you with this then all your storage ideas are easily achievable as we are fully custom and love getting creative.
  • Style – Super important to make sure you are still matching the current style of your bathroom a beautiful coat of paint on the cabinetry and a stunning stone bench top would look great in any style of room. The options are totally endless.
  • Accessorize –  If you feel like you are needing just that one more thing to bring everything together, buy a nice scented candle or even a plant – a bigger mirror can create the illusion of having a bigger room also!


History (the interesting stuff!)

The original bathroom vanities is pretty much zero resemblance to what the term probably makes you think of today. In fact, until just a little over a hundred years ago, the bathroom as a whole didn’t really exist. The very first “bathroom vanities” were really washstands (just a wooden stool really!) These small wooden tables sat somewhere in your bedroom, equipped with a pitcher full of water and a bowl to wash your face and hands first thing in the morning.

It didn’t come into effect until the Victorian era that bathrooms became separate rooms and started to resemble what we would think of as a modern bathroom. It’s also when we started to really jump aboard the indoor plumbing era. At this stage, “bathroom vanities” evolved into fitted wall mounted sinks. Back the, the bathroom was nowhere near as practical as they are today and they where all super standard compared to all the different styles/designs out there.

Did you know, for many years the bathroom was viewed as an extension of the bedroom rather than it’s own private space? and as indoor plumbing improved, console vanities evolved into more functional, more particular bathroom vanities. These were often based on the design of furniture – dressing tables, chests, or cabinets.

Over the years these vanities have gradually became more simplified yet still gripping the practicality at the same time, we love this! there are so many designs out there in which you can totally alter to make it your own style – we are taken back in time with all the older vanities and it amazes us on how far we have evolved the meaning and style/s of vanities, best thing about this is that we are always going to change and evolve different, new styles, colour schemes, practicality etc ,. We are just so excited to see the unfold as the years continue to flow on.


I hope you have found this interesting, i would love to know your thoughts on this – what vanity style is your favorite?

Ceiling designs to seriously consider

Today I was inspired to bring up a topic that caught my eye whilst looking at inspiration photos for kitchen design trends that have come out in the newer catalogues from our suppliers and it gave me the wonderful idea for this blog – so let’s talk ceiling styles.

Before we jump on in to the different styles, I wanted to incorporate the history behind the ceiling styles and how they came about so upon researching and asking a tonne of (probably annoying) questions I have found the answers.

The craft of what’s now known as a “dropped” ceiling design backdates deep into architectural history, you see – over time ceilings where dropped for several reasons for the practicality and to suit the style of the house (and of course the build of the house itself)  and for decorative purposes. Decorative tiled ceiling designs backdate to the 1300’s in japan while roman ceilings brought some of the most artsy designs that we’ve ever known.

The time came when the northern Europe finally took to this trend, especially in France where Baroque coffered designs with ornate rosettes and straightforwardly detailed crown molding took center stage among high-society.

Our point is this, if you’re renovating, or a new build is on the cards, it’s worth putting some thought into the details that can go into your ceiling for just what you need to pull everything together, dimension, and value.

Let’s have a look at some of the different styles – there are so many different designs out there, so we will only show the ones we have selected that catches the eye:


Crown Design:

While common this can be simple and contemporary or detailed and ornate, the photo below shows moulding offers just the right amount of ornamental detail to this design.

Crown Ceiling

Crown Ceiling


Tray Ceiling:

Tray ceilings have wedged their way back into style and we can’t complain with the gorgeous effect this gives the room, no matter what your style is, this will always be a great choice, innovative lighting diverts their design to a functional yet luminous focal point within any room, especially dining, living, master bedroom spaces and even outdoor living spaces. Super versatile!

Tray Ceiling

Tray Ceiling


Beamed:

Now this has to be one of my ultimate favourite designs, not only do they allow for constructive practicality but also blends just gorgeously with designs, from simple and sleek to modern and magnificent these really can make a statement.

Beamed Ceiling

Beamed Ceiling


Flat:

The floating ceiling is certainly a catch for the more simple yet sleek looks,  you can’t go wrong with this style – this can fit in with any style your heart desires.

Flat Ceiling

Flat Ceiling


Rosettes:

Rosettes were highly popular and favored by the french for their very detailed designs, there is just something so beautiful and superior about these styles of ceiling. It is somewhat uncommon these days to see this in a home but such an awesome idea, if you like this style i HIGHLY recommend going for this.

Rosette Ceiling

Rosette Ceiling


Skylights:

The main benefit that everyone knows is by having a skylight you are allowing more light to flow freely inside and lighten the room up a bit better, Villum Kann Rasmussen started his company on April 1, 1941, specializing in glass roofs, he soon came up with the brilliant idea to transform dark attics into living space with daylight and fresh air. Who doesn’t like an extra bit of sunshine gleaming into the kitchen to show off that beautiful new benchtop? or the idea of having a window to get rid of the smoke let off from accidentally burning that delicious meatloaf…

Skylight Ceiling

Skylight Ceiling


Kitchen

Refresh that rental

Are you currently in a cosy rental but the idea of a new kitchen excites you? We all know with rentals we are quite limited with what we can and can’t do, this can be a bit of an itch we NEED to scratch – especially after going through all the possible ideas for design and what our dream kitchen would be when we win lotto. Good news is; I have the perfect guide to achieving the feel of a new kitchen without overstepping our limitations.


This first step is a bit of a questionable one until you read the reasoning as to why I have added this in, start sprucing up the room by adding a plain, medium sized mirror in the kitchen it does in fact achieve all sorts of visual positivity. It’s an unexpected element in the kitchen so it instantly makes a statement. If you have a window, it’ll help spread the light around. If you don’t have a window, it’ll be even more vital for reflecting what light you do have in the room.

Create a temporary splashback in the kitchen, a lot of times rental kitchens don’t have any sort of splashback as they are just done to be as basic as can be whilst focusing on that practicality but whose to say you can’t spice it up a bit? You may need to run this past your landlord, but you can achieve this by using a small cut of a detailed/patterned wallpaper in which you can buy from your local paint shops (& even hardware stores if they stock wallpaper!) super easy yet super fun way of adding a dash of your style, temporally.

Do you have old, raggedy flooring that you just want to take a jack hammer to get rid of the awful eye sight? Use a rug – you can get as creative as you like with all these different sorts of rugs out there and you can use any size to cover how ever much you like (bonus with this is you can take this rug with you if you decide to move or even change it up when desired with another rug! Winning)

Boring cabinets? Colour not quite up your alley or isn’t quite linking in with your other colour scheme going on in the rest of the house? Try getting some contact paper, temp wall paper or even vinyl to give your cabinetry a new beginning – just be sure that you can remove whichever product you use without damaging the underneath and, some may need consent from the landlord.

As we all know and have seen how amazing open shelving looks in the kitchen you may not quite have that in a rental, unfortunately there is no real way to have proper floating shelves without getting consent and spending some money to achieve that BUT I can help you fake this look in a more easier, affordable way and this involves taking the doors off your cabinetry where you desire to have open shelving. Of course, this will look a bit different to open shelving, but it is a pretty close idea in comparison and it keeps the area looking more open and modern (just be sure to store those doors safely away and easy to put back on if needed.)

Add a magnetic knife block or a utensil wall holder, these are easy to install and can be taken off when you no longer need that – this looks edgy and keeps storage under control.

Add some plants to jazz up the positive vibes in your kitchen,  plants can uplift your mind set and feel more relaxed – you can even add some herbs and spices so when your cooking up a storm you have this right at your fingertips! Super cute idea and an amazing way to spruce up your kitchen.

Don’t have a ton of space do your prep work? Consider DIYing or buying a chopping board that covers your kitchen sink or stove when you’re not using them to add extra space to work. this creates more space and you can store this easily – another advanced option is to DIY your own kitchen island with wheels! look ideas up on Pinterest as there are so many we couldn’t just choose one!


Hopefully you feel like your in the next best thing to your dream kitchen in your rental kitchen.

A brief history about the kitchen

Today i wanted to take everyone back to the very first kitchen and the history of how we have evolved into today’s design. Everyone knows or may have seen the bright, funky colors and basic, similar designs kitchens where a few decades ago (in my opinion, i love modern but i also love retro and original! so evolving into the styles and trends of today was and still is very exciting for me) and we’ve all seen and heard of the newer kitchen designs dated as of today, the future designs really interest me.

Get comfy, make a hot tea and be prepared to see the timeline.

  1. THE ORIGINS – Back in ancient times and I’m talking years and years ago, our ancestors cooked on open fires that were constructed outside on the flat ground, later on they had an idea to construct something that would hold pots and pans above the heat instead of holding them, themselves. they had come up with a simple, masonry design which was put in place to hold the handles of the pots and pans etc. In this era, the food was often placed in metal cauldrons that were hanging above the fire. These cooking areas naturally caused people to gather as they were the primary source of heat, light, safety and of course, food. The smoke and soot let off from the fires were a HUGE problem until the 16th century as it would go everywhere, this is when chimneys came into the mix With a chimney, smoke was drawn up and out of the great hall, making it easier to breath and easier to create large cooking fires in fireplaces. Here’s a picture to show you exactly how it was:
12th Century Kitchen

12th Century Kitchen


2. THE DEVELOPMENT OF STOVES – Moving along to the year of 1735, economic trends and politics had a massive influence on the practicality and design of the kitchen, technological advancements were constant many of which came in effect to minimize the time spent on a meal and the work involved around it, in the 18th century this is where we would find this design to come into effect (still fueled by wood at this stage.) One of the earliest wood-burning kitchen stoves was the Stew Stove (or Castrol Stove) developed in 1735 by the French designer Francois Cuvilliés. An early yet famous example of a metal stove is the Franklin stove (pictured below) which came into effect in the 18th century, invented by Benjamin Franklin (thats right, the guy you see on American $100 bills) in 1742. It had a special guide in place for hot gases to escape, allowing heat to enter the room instead of going up the chimney. However, this stove was designed only for heating, not for cooking – Strange huh?! The industrial revolution encouraged new inventions, cheaper prices, and new ways of efficiency. The most common stove for heating in the industrial world for almost a century and a half was the coal-burning one. Coal stoves came in all sizes and shapes and different operating principles. Since coal burns at a much higher temperature than wood, coal stoves needed to be constructed to withstand the high heat levels.


1735 - Oven

1735 – Oven


3. THE OBERLIN STOVE – Progressing a little up the timeline to 1834, a man named Philo Stewart took it upon himself to design a compact, wood burning cast iron stove in which was named the Oberlin Stove. this was a metal stove, small enough to use for cooking. It was much more efficient than cooking in a fireplace this is because it had increased cooking temperatures and had the option to record cooking times. It actually blew up and became a major success for Philo,  it could be cast into decorative shapes and forms and could easily withstand temperature swings from hot to cold. These iron stoves evolved into specialized cooking appliances with flue pipes connected to the chimney, oven holes, and installations for heating water.

1869 - Philo

1869 – Philo


4. THE MOVE TO GAS STOVES – Complaints and concerns about air pollution from the smoke excretions arose and sent a decline in coal stove purchases way down hill – Gas the became the next best thing. Because they were fueled by gas the production of the oven became lighter and even smaller! the genius British inventor James Sharp gave a big yes to the gas stove invention in 1826. By the 1920s, gas ovens were used in most domestic kitchens and was very rare to see the older ones.

1826 - James Sharp

1826 – James Sharp


5. THE GRAND APPEARANCE FROM THE ELECTRIC OVEN – This oven caused quite the competition between the Gas stove and itself, this occurred in the 1920’s and 1930’s. The Copeman Electric Stove Company (based in Michigan) received the first patent for an electric stove in 1912. Copeman Electric Stove, 1912 – Mostly wood, it had two ovens, top units, automatic timer and heat control.

Copeman Electric Stove, 1912

Copeman Electric Stove, 1912


6. MODERN KITCHEN DEVELOPMENT (Post world war #2 onwards…) – The housing and manufacturing development of post World War 2 made a huge effect on what we class as the “modern” kitchen nowadays. There was a major jump in demands for kitchen technology and equipment that inspired homeowners  to rip down the walls that once hid their efficient kitchens. The kitchen was becoming quieter, cleaner, better organized and easier to work in, a sense of pride, and slowly a place to entertain family and friends. In the 1960’s and 1970’s other social changes were taking place that upgraded the style and trend of the kitchen, a renewed interest in home baking/cooking, having a dedicated space for utensils and even entertaining was suitable for having the kitchen be the heart of the home. The kitchen became a place for improving baking skills, displaying fancy (expensive) cookware and becoming the heart for social gatherings. By the 1980’s, the idea of a completely open kitchen with appliances in the open, came into the new idea of design.

1960's - Kitchen

1960’s – Kitchen


7. CONTEMPORARY KITCHENS – Today’s ovens have evolved into more time, health and energy efficient, our appliances are finally catching up with our fast moving lifestyles, speed ovens for instance, cuts the cooking time in half which actually saves energy used during meal preparation The kitchen doesn’t look like the kitchen, in the traditional sense. It’s now a clean space, with a full range of sleek appliances looking towards a sustainable future. Only up from here and we’re excited to see what the future brings.

2018 - Kitchen (Next Edition Kitchens)

2018 – Kitchen (Next Edition Kitchens)

Flooring

Install Kitchen Cabinetry Or Flooring First?

A repetitive, yet relevant question you may be asking yourself could be delaying your first step to renovations and that tricky questions is: “Do I reface my cabinetry first or does the flooring need to be done first?” Google has all sorts of answers which can often lead back to square one of being confused again – although there is no wrong way to do this there is safer, more practical ways of sorting the schedule.

When you replace your cabinetry, your existing flooring does run the basic and obvious risk of damage, although our busy working bee’s take all precautions there can be some un-intentional markings/damage made.

Here’s where you may be getting confused; when you are having a whole new kitchen put in, flooring is best to go in BEFOREHAND as the layout of the new kitchen will most likely be different therefor flooring is required to go in first to guide the layout BUT when you are just refacing the existing units the flooring is suggested to wait until after the refacing is done as the layout is set up already so the workers can update the fronts and the flooring is being updated in the existing layout it already is generally.

One of the benefits to having the kitchen renovated first is that you can be more confident in your flooring selection, matching your cabinet finish to smaller flooring samples and hypothetical finishes is about as helpful as painting a home’s interiors via the colours shows on small paint swatches—a process many of us have pulled our hair out over, by waiting to install your flooring after the kitchen is done, you’ll have some time to contemplate which colours or finishes will look best with your brand-new kitchen.

The only exception – install floating hardwood floors AFTER the cabinets, if you are planning on having a hardwood floating floor (or any floating floor such as cork or laminate) you should consider installing the flooring after, why? Because floating floors are clicked together and not glued down to the floor, the reason for this is that the floating floors tend to move, and they expand and contract. If part of the floor is trapped under the cabinetry (which is quite heavy) it cannot properly move resulting in all sorts of issues including bulging, buckling or even breaking. Having this in BEFORE the cabinetry ensures the cleanest look with the cabinets – you don’t need to worry about cutting some to size to fit around the cabinetry and instead can have a nice, flush floor with no issues.


There we have it! hoping this helped a few head scratches and has helped you move onto the next step.

Oven

How to clean your oven naturally

Today I am inspired to write this blog as my oven is in dire need of some TLC – I did some research on how important this is and the results where mind blowing, I had no idea how regularly you theoretically should be “maintaining” your oven. It seems to be one of those things that “you’ll get around to that tomorrow” and tomorrow turns into the next day, and the day after that and so on but let me remind you how important this is!

My first question I had when I opened my oven last night was “when did I even last clean this?” my answer was struggling to come to mind, it must have been a good 4 months ago (not so bad, right?!) well – WRONG! Here my next question came, how often are you supposed to clean your oven?

Once. Every. Month. HOW BIZARRE! Of all the years I have been in charge of that sort of thing, I never even realized there was actually a time period on how often you should be doing it.

Why is there a time on this? I get the hygiene side of it but what’s the actual history behind this? Simple, your oven can become less efficient at reaching temperatures and eventually may just stop working all together if burnt food/build-up is left unattended.

Crusty build up can also impact the taste of your food and, while high temperatures can kill some bacteria, it’s not a good place to be cooking food (like I said, hygiene)

So, now that I’ve got you itching to go have a look at your ovens – I also have a natural guide on how to clean your oven without even turning it on, this method is super easy and really cost efficient.


What you will need:

  • Baking Soda (1/2 cup)
  • Water (to make a paste)
  • Rubber Gloves (Preferably durable, non-disposable ones)
  • Damp dishcloth
  • Spray Bottle
  • Vinegar (White)


Instructions:

  1. Clear out the oven

Take out all dish-racks (clean those as well) make sure everything is removed so you have access to get deep in the back of the oven to clear that build-up.

  1. Mix the paste

In a small bowl, mix a 1/2 cup of baking soda with a few tablespoons of water. Adjust the ratio of both as needed until you have a spreadable paste.

  1. Coat the oven

Spread the paste all over the interior surfaces of your oven, steering clear of the heating elements. Use gloves for this portion, as the oven may be pretty gunky. The baking soda will turn a brownish colour as you rub it in; it also might be chunkier in some places than others, which is fine. Just try to coat the whole oven to the best of your abilities, paying extra attention to any particularly greasy areas.

  1. Let it sit overnight

Allow the baking soda mixture to rest for at least 12 hours, or overnight.

  1. Wipe the oven out

After 12 hours or overnight, take a damp dish cloth and wipe out as much of the dried baking soda paste as you can. Use a plastic spatula to help scrape off the paste as needed.

  1. Spray a little bit of vinegar

Put a little vinegar in a spray bottle and spritz everywhere you still see baking soda residue in your oven. The vinegar will react with the baking soda and gently foam.

  1. Do a final wipe down

Take your damp cloth and wipe out the remaining foamy vinegar-baking soda mixture. Repeat until all the baking soda residue is gone. Add more water or vinegar as needed while wiping to really get the oven clean and shiny.

  1. Replace your clean oven racks

Replace the oven racks and anything else you keep in your oven, and you’re done!


Go give that oven some TLC – You’ll thank yourself later.

Spring

Make Your Kitchen Spring Ready!

What pops to mind when you hear or see the word spring? For me it’s a feeling of freshness, a window of new beginnings and a great chance for ideas to bloom. This is a great chance to spice up your kitchen and give it that “Spring” feeling, don’t run away in fear this will cost an arm and a leg because it certainly doesn’t have to burn a hole in your pocket.


Get that feeling of freshness:

Starting small at a very low cost (or if any cost at all) Firstly, gather some flowers and a pretty vase that draws you in – this will give that feeling of a crisp, fresh feel. No need for a large, over-the-top floral arrangement… just a few stems will do the trick! Change it up with colours to compliment the season, here’s a few:

  • Lavender/Purple
  • Rapture Rose (Intense pink)
  • Sky Blue
  • Peach
  • Yellow

Just to name a few, feel free to incorporate any coloured flowers you like!

A window for new beginnings:

When was the last time you fully renovated your cooking utensils range? Swap out the cutting board that has seen better days and the plain plastic cooking utensils and replace them with ones that have a little more energy, Spring is also a great excuse to biff all your tea towels that have seen better days and replace them with new, fresh ones.

New ideas to bloom? I think yes!

Forget about making a huge investment – a small painting or framed quote is an affordable way to own a piece of original art. Get creative and visit your local opshop or even get one of the kids to paint you a picture!  You can frame it and then rest it on your benchtop, or even hang it up on an empty piece of your kitchen wall.

Bring the texture in

Wood and natural wovens are such a golden addition to any space, they add a bit of texture to the area and interest as well as warmth. Find a large bowl and fill it with fruit and your kitchen will be screaming its spring ready.

This is a few ways to get your kitchen in the spring season and will be easy to change when the next season is on the way! Some of these ideas can be incorporated with other seasons anyway